
Landscape Wrap

If you’ve been following along on social media or via my newsletter, chances are you’ve already seen the sneak peeks of the new Landscape (and Vista) Wrap! This latest design is part of a KAL (knit-along) with Lion Brand using our collab yarn, Color Theory. Kits have been on sale for a few days now so some of you may have already scored the pattern early if you purchased one, but now everyone has access here on the blog! Scroll down for the free pattern, purchase a printer-friendly PDF of the pattern here, or purchase the kit with all the yarn you’ll need plus a PDF of the pattern here.
Looking for the crochet version? Check out the Vista Wrap here.
Lastly, check back on July 15 when the first video tutorial for this project will be added to this blog post. For the full KAL calendar with tutorial release dates, keep reading!

Knit your favorite landscape into this meditative wrap designed to represent the view that lights you up. Whether it’s the calming horizon of your home or a faraway vision in your dreams, choose a color palette that speaks to your soul and indulge in the simple stitches and textures that transport you there. The Landscape Wrap is meant to evoke the feeling of a place through the colorstory and soft, subtle textures.
Ready to join the KAL? Have a look at our calendar:
June 27
Kits launch along with mood boards and color combo inspo
July 1
Free patterns go live on the Two of Wands blog with intro videos
July 15
Official start of the KAL/CAL along with the first set of tutorial videos for both wraps
July 26
The next set of tutorial videos for both wraps go live
August 5
The last video tutorial for the Landscape Wrap goes live
August 9
The final tutorials for finishing both wraps goes live
August 16
That's a wrap - sport your finished pieces in front of your favorite landscape or vista!
In between you can expect color combo guidance, styling tips, and a lot of fun! Checking out everyone else's color combos and progress is always one of my favorite parts of a KAL/CAL like this. If you’d like to join us, there’s no official way to sign up - simply connect with others on Instagram using the hashtag #landscapewrapkal and/or share your projects in the Crew of Wands Facebook group.
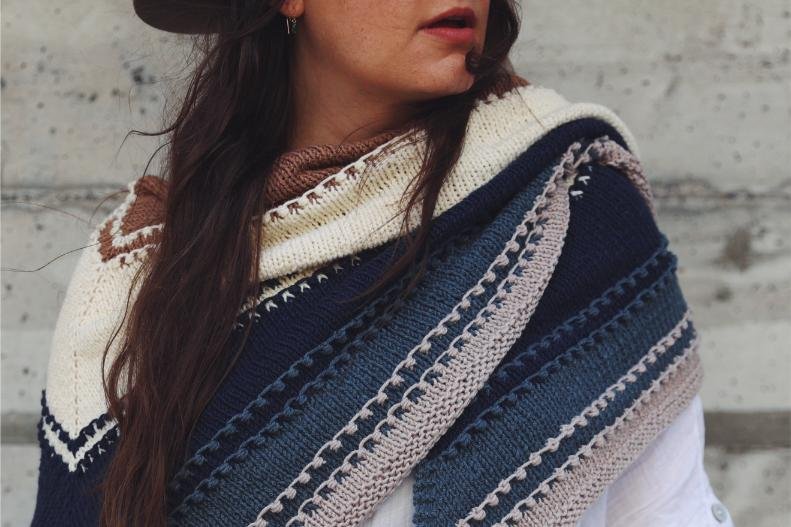
When I set out to design this wrap (and the crochet Vista Wrap), I wanted to create something that was as universally loved as possible and something that could be customized and personalized to represent something special for the maker or the receiver in the case of a gift. To do this, I took inspiration from some of my most popular designs, all triangle wraps, and added details from them to ensure this new project had all of the best bits. I focused on simplicity so the projects would be on the easy side and more people could join in on the KAL. And lastly, because I knew color would play a major role in personalization, I dreamed up 15 different themes and created special mood boards for each to really give a feeling to each one. Places, locations, views - they often hold so many memories and emotions and I figured that was the best way to go about choosing colors for this piece.

If you’re a fan of this design and curious to check out the other triangle wraps that inspired it, here are some good ones with which to start:


I took color inspo from the Coffee Shop Wrap (one of my all-time best sellers), stripe progression inspo from the Shadowplay Wrap, and stitch inspo from the Reverb Wrap!

Because the Landscape Wrap is worked up in Color Theory, a smooth all-season yarn, the finished piece is a lightweight, squishy, drapey dream with butter soft fabric that is also machine washable and dryable! This yarn glides off the needles and is so enjoyable to work with. It also has the most perfect palette of 18 colors that were carefully curated to work together. When selecting the colors for this yarn, I chose colors for different seasons and made sure there was plenty of contrast and a beautiful selection of neutrals (there are six!) so that combining colors would be a breeze. The palette couldn’t be better for this project!

As I mentioned I put together 15 different themes for the KAL/CAL, and because both the Landscape Wrap and the crochet Vista Wrap each use only 1 skein of 5 colors, you can choose any of the themes regardless of which craft you choose. You can check out all 15 themes and learn how to put together your own combo if you want to go rogue here. For my Landscape Wrap, I went with the Moonlight Shores theme. I used to primarily only design using these steely blues and neutrals, and I just LOVE the way they go together. This combo feels like a classic Two of Wands colorstory.


After I chose the colors for each theme, I took time to put them into a specific order as well (the progression). Did you know that with five colors, there are literally 120 different ways to arrange them!? MIND. BLOWN. Depending on the progression you choose, you can really get a totally different look even with the same five colors. All of the themes include the progression I think looks more visually appealing, but of course this whole project is meant to be personalized so it’s really up to you how you want to arrange them!

This is an easy level knitting pattern, and the techniques involved are knitting, purling, m1r and m1l increases, YO increases, K3tog tbl decreases, and changing colors in stripes. Once again, video tutorials will be added to this post throughout the course of the KAL so make sure to check back! If you run into trouble and need assistance, be sure to join the Crew of Wands Facebook page where those who use my patterns can share their projects, connect, and provide help to each other.

MATERIALS
1 skein each Lion Brand Yarn Color Theory in Nutmeg (619-124AD) for color A, Ivory (619-098AW) for color B, Admiral (619-110BJ) for color C, Stonewash (619-109W) for color D, and Bone (619-122X) for color E
(worsted, weight 4; 246yds/225m per skein)
Size US 8 (5mm) circular knitting needles, 32”/80cm or longer
Stitch markers or scrap yarn
Tapestry needle
GAUGE
16 sts + 24 rows = 4”/10cm in stockinette
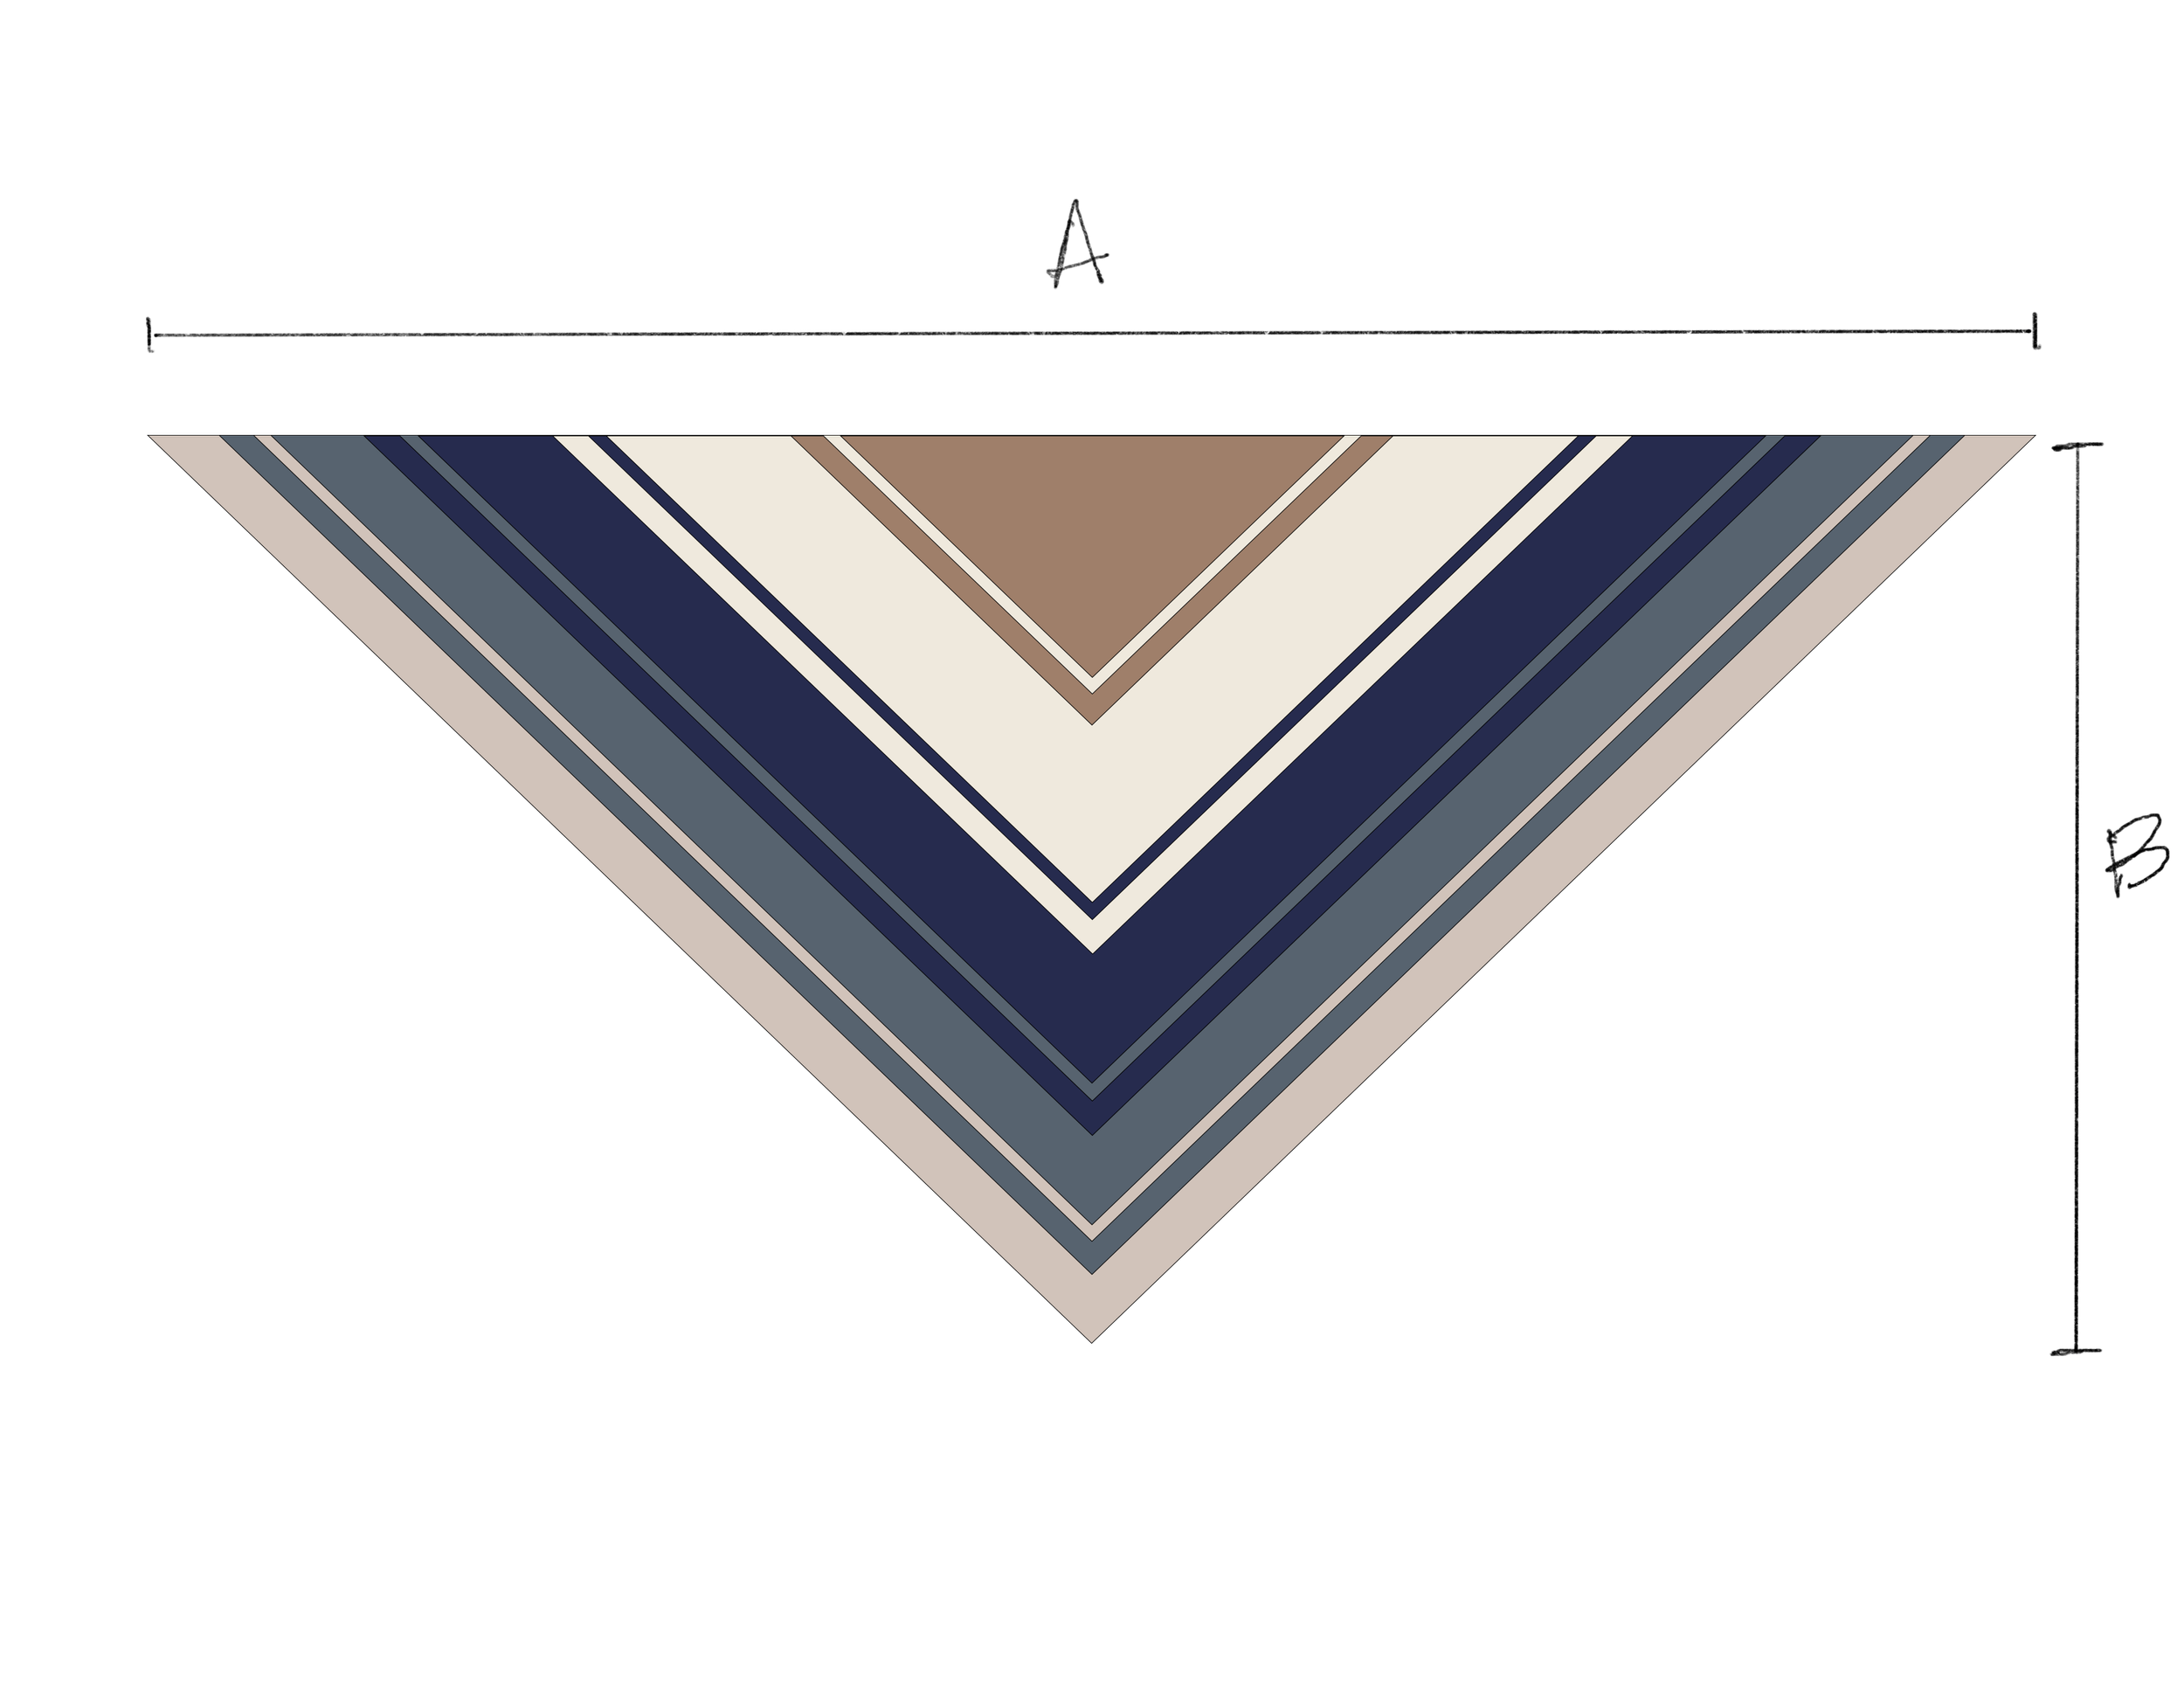
FINISHED DIMENSIONS
A) 72”/183cm
B) 33”/84cm
ABBREVIATIONS
*All Two of Wands patterns are written in standard US terms.
CO – cast on
K – knit
K3tog tbl – knit 3 together through the back loop
M1l – make 1 left
M1r – make 1 right
P – purl
Pm – place marker
Rep – repeat
RS – right side
Sl – slip
Sm – slip marker
St(s) – stitch(es)
WS – wrong side
Wyib – with yarn in back
YO – yarn over

Note: Wrap is worked from the top down, increasing 4 sts on every right side (even) row after the set up rows. Pattern is composed of sections of stockinette and two-row textured stripes, ending with a garter stitch section to prevent curling along the edges. Carry the dominant color up the side of the work when knitting the textured stripes to avoid weaving in extra ends. The bound off edge forms the outer v-shaped sides and it is important to bind off loosely to prevent this edge from pulling so it will drape nicely.
With color A, CO 5 sts.
Set up rows:
Row 1 (WS): K 2, pm, P 1, pm, K 2.
Row 2 (RS): K 2, m1r, sm, K 1, sm, m1l, K 2. (7 sts)
Row 3: K to marker, sm, P 1, sm, K to end of row.
Row 4: K 2, m1l, K 1, m1r, sm, K 1, sm, m1l, K 1, m1r, K 2. (11 sts)
Row 5: K 3, pm, P 2, sm, P 1, sm, P 2, pm, K 3.
Stockinette section 1:
Row 6 (RS): K to marker, sm, m1l, K to marker, m1r, sm, K 1, sm, m1l, K to marker, m1r, sm, K to end of row. (15 sts)
Row 7 (WS): K to marker, sm, P to marker, sm, P 1, sm, P to marker, sm, K to end of row.
Rows 8-69: Rep rows 6 and 7, 31 times. (139 sts)
Textured stripe 1:
Change to color B.
Row 70 (RS): K to marker, sm, m1l, *sl 1 wyib, (K 1, YO, K 1) in next st, rep from * to next marker, m1r, sm, K 1, sm, ml1, **(K 1, YO, K 1) in next st, sl 1 wyib, rep from ** to last marker, m1r, sm, K to end of row. (143 sts)
Row 71 (WS): K to marker, sm, P 1, *sl 1 wyib, K3tog tbl, rep from * to 1 st before next marker, P1, sm, P 1, sm, P 1, **K3tog tbl, sl 1 wyib, rep from ** to 1 st before last marker, P 1, sm, K to end of row.

Stockinette section 2:
Change to color A.
Rows 72-75: Rep rows 6 and 7, 2 times. (151 sts)
Textured stripe 2:
Change to color B.
Rows 76+77: Rep rows 70 and 71. (155 sts)
Stockinette section 3:
Rows 78-107: Rep rows 6 and 7, 15 times. (215 sts)
Textured stripe 3:
Change to color C.
Rows 108+109: Rep rows 70 and 71. (219 sts)
Stockinette section 4:
Change to color B.
Rows 110-113: Rep rows 6 and 7, 2 times. (227 sts)
Textured stripe 4:
Change to color C.
Rows 114+115: Rep rows 70 and 71. (231 sts)
Stockinette section 5:
Rows 116-135: Rep rows 6 and 7, 10 times. (271 sts)
Textured stripe 5:
Change to color D.
Rows 136+137: Rep rows 70 and 71. (275 sts)
Stockinette section 6:
Change to color C.
Rows 138-141: Rep rows 6 and 7, 2 times. (283 sts)
Textured stripe 6:
Change to color D.
Rows 142+143: Rep rows 70 and 71. (287 sts)
Stockinette section 7:
Rows 144-153: Rep rows 6 and 7, 5 times. (307 sts)
Textured stripe 7:
Change to color E.
Rows 154+155: Rep rows 70 and 71. (311 sts)
Stockinette section 8:
Change to color D.
Rows 156-159: Rep rows 6 and 7, 2 times. (319 sts)
Textured stripe 8:
Change to color E.
Rows 160+161: Rep rows 70 and 71. (323 sts)
Stockinette section 9:
Rows 162-165: Rep rows 6 and 7, 2 times. (331 sts)
Garter stitch edging:
Row 166 (RS): K to marker, sm, m1l, K to marker, m1r, sm, K 1, sm, m1l, K to marker, m1r, sm, K to end of row. (335 sts)
Row 167 (WS): (K to marker, sm) twice, P 1, sm, K to marker, sm, K to end of row.
Rows 168-171: Rep rows 166 and 167, 2 times. (343 sts)
Bind off loosely.
Block work. Secure and weave in all ends.

Tassels:
Cut ninety 10”/25cm lengths and three 18”/46cm lengths of color A and three 18”/46cm lengths of color B. Divide the 10”/25cm lengths into three groups of 30. Tie each bundle at the middle point with one of the 18”/46cm lengths of color A. Fold each bundle in half so that the tie is at the tip of the loop created with the fold.
Tie crosswise around each folded bundle about 1⁄2”/1.25cm below top of fold with remaining 18”/46cm lengths of color B. Wrap the tails of the ties around and around the bundles and then thread them inside and down the middle of the bundles with a tapestry needle. Tie the tops of the tassels onto the 3 corners of the wrap and knot to secure. Thread the tails inside and down the middle of the tassels using a tapestry needle. Trim tassels to desired length.

Purchase the printable, ad-free pattern here.
Purchase the kit from Lion Brand here.
Don't forget to share your projects made using Two of Wands patterns on Instagram with the hashtag #crewofwands to get featured on my page and be in the running for monthly pattern giveaways!
Join the Crew of Wands Facebook group to connect with other makers of Two of Wands patterns for help with techniques and pattern related questions.
The patterns and photographs of items on this site are the property of Two of Wands and are for personal, non-commercial use only. These patterns files are protected by US copyright, and you may not distribute or sell them electronically or physically. Small batch sales of finished pieces made from these patterns are permitted, but seller must use their own photographs and credit must be given to Two of Wands as the designer.