Candy Dots Throw
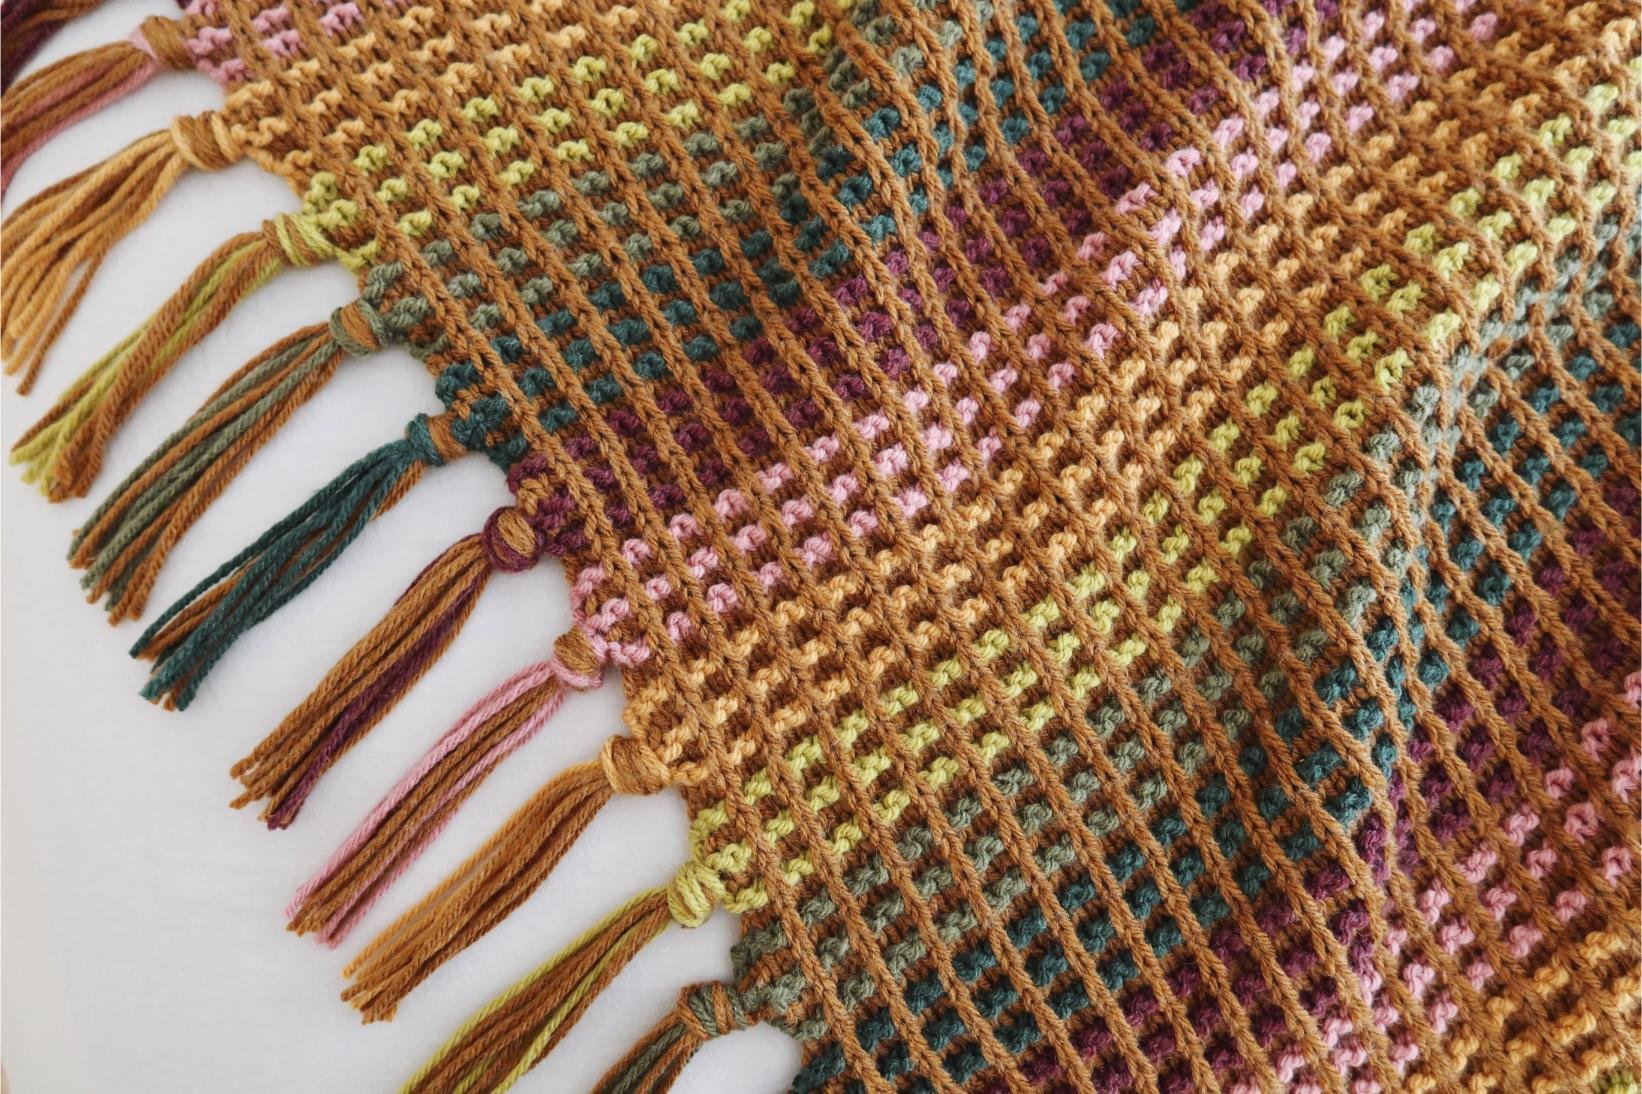
Blankets. One of the most time consuming yet enjoyable things to make, amiright? There are so many things to love about blankets when it comes not only to designing and making them but also using them! My latest blanket design leans heavily into texture and colorwork to bring some brightness and cheer into the home on these grey winter days. Using only basic stitches and an easy slip stitch technique, this design works up quickly using bulky Hue + Me but looks so much more complicated and impressive. Scroll down for the free pattern, purchase a printer-friendly PDF of the pattern here, or purchase the kit with all the Hue + Me yarn you’ll need here.
The biggest drag when it comes to using lots of colors is the fact that it creates more ends to weave in. That’s probably my least favorite part of any project (and I don’t think I’m alone here) so if I have the opportunity to utilize those ends for something like fringe, it makes the whole project that much more enjoyable! I’ve used this technique with several other designs such as my Stargazer Throw, Moonstone Plaid Blanket, Wildwood Plaid Blanket, and now with this design as well.
First let’s talk about my love of blankets. When it comes to designing them, they’re truly a blank canvas that allows you to explore endless stitch and color combinations without any boundaries. It can be so much more complicated and difficult to incorporate things like this into garments and accessories because of shaping, but a big rectangular blanket doesn’t really have any restrictions.
Then it comes to making the blanket. When I design a garment or accessory, I’m often designing AS I’m making the piece because as I start to shape things it may change the course of the design and it’s kind of a guessing game along the way. With a blanket I can plan out my entire design in advance and then just sit down to knit it as if I was following someone else’s pattern. And let me tell you, not having to constantly stop, measure, write down what you’re doing, re-think, and re-work, makes the stitching process like a dream. You also have the added benefit of being able to “use” the blanket while you’re making it as it can rest on your lap.
Finally, the end result of a blanket project is a big cozy throw that the entire family can enjoy. Unlike a garment or accessory that may get worn here and there, a blanket is something that can be on constant display in your home. They make such thoughtful gifts, and they really feel like a piece of art. From concept to completion, a blanket is truly one of the best projects.
When it came to designing this throw, I took a lot of inspiration from my crochet Stargazer Throw. I loved how the stripes created columns of pops of color against the main color background, so I used that same concept here. I didn’t have a name for it initially, but as soon as I started to knit it I realized that the little dots of colored texture looked just like those old school candy dot/button papers! Now it feels super nostalgic to me and makes it even more joyful to look at.
This is an easy level knitting pattern and the techniques involved are the knit stitch, purl stitch, slip stitches, and changing colors.
MATERIALS
6 skeins Lion Brand Hue + Me in Arrowwood (617-132) for main color
1 skein Lion Brand Hue + Me in Crush (617-189Q) for contrast color 1
1 skein Lion Brand Hue + Me in Pink Earth (617-195U) for contrast color 2
1 skein Lion Brand Hue + Me in Mustard (617-158I) for contrast color 3
1 skein Lion Brand Hue + Me in Dirty Chartreuse (617-177P) for contrast color 4
1 skein Lion Brand Hue + Me in Moss (617-176J) for contrast color 5
1 skein Lion Brand Hue + Me in Night Forest (617-175N) for contrast color 6
(bulky, weight 5; 137yds/125m per skein)
Size US 11 (8mm) circular knitting needles, 47”/120cm long
Size US J/10 (6mm) crochet hook
Tapestry needle
GAUGE
11 sts + 20 rows = 4”/10cm in pattern as follows:
CO a multiple of 3 + 2.
Row 1: K.
Row 2: P.
Row 3: *K 2, sl 1 wyib, rep from * to last 2 sts, K 2.
Row 4: *K 2, sl 1 wyif, rep from * to last 2 sts, K 2.
Rep rows 1-4.
FINISHED DIMENSIONS
Width: 43.5”/110.5cm
Length: 56.5”/143.5cm
ABBREVIATIONS
*All Two of Wands patterns are written in standard US terms.
CC – contrast color
CO – cast on
K – knit
MC – main color
P – purl
Rep – repeat
RS – right side
Sl – slip
St(s) – stitch(es)
WS – wrong side
Wyib – with yarn in back
Wyif – with yarn in front
NOTES
Blanket is worked flat in back and forth rows widthwise. Cut each color when changing to the next color. Tails are left at the ends of each color change and are worked into the fringe tassels at the end.
PATTERN
With MC, CO 155 sts leaving a 12”/30.5cm tail.
Row 1 (RS): K.
Row 2 (WS): P.
Change to CC1, leaving a 12”/30.5cm tail of both MC and CC1.
Row 3: *K 2, sl 1 wyib, rep from * to last 2 sts, K 2.
Row 4: *K 2, sl 1 wyif, rep from * to last 2 sts, K 2.
Change to MC, leaving a 12”/30.5cm tail of both CC1 and MC.
Rows 5-216: Rep rows 1-4, changing colors every 2 rows in the following sequence, which will be repeated 3 times:
MC (already worked for rows 1+2)
CC1 (already worked for rows 3+4)
MC
CC1
MC
CC1
MC
CC2
MC
CC2
MC
CC2
MC
CC3
MC
CC3
MC
CC3
MC
CC4
MC
CC4
MC
CC4
MC
CC5
MC
CC5
MC
CC5
MC
CC6
MC
CC6
MC
CC6
Change to MC, leaving a 12”/30.5cm tail of both CC6 and MC.
Row 217: K.
Row 218: P.
Bind off loosely, leaving a 12”/30.5cm tail.
FRINGE TASSELS
Cut nine 24”/61cm lengths of each CC and fifty-five 24”/61cm lengths of MC.
Attach each length to the corresponding colors along the short edge of the blanket opposite the side where all of the tails were left using larks head knots. To do so, fold a length in half and use the crochet hook to pull the folded loop through a space along the edge, then draw the ends of the strands through the loop to create the larks head knot.
Once all fringe is attached, gather the strands that make up one 12 row color section and tie them together with an overhead knot. Repeat for each section along both ends of the blanket. Trim tassels to desired length.
Purchase the printable, ad-free pattern here.
Purchase the kit from Lion Brand here.
Don't forget to share your projects made using Two of Wands patterns on Instagram with the hashtag #crewofwands to get featured on my page and be in the running for monthly pattern giveaways!
Join the Crew of Wands Facebook group to connect with other makers of Two of Wands patterns for help with techniques and pattern related questions.
The patterns and photographs of items on this site are the property of Two of Wands and are for personal, non-commercial use only. These patterns files are protected by US copyright, and you may not distribute or sell them electronically or physically. Small batch sales of finished pieces made from these patterns are permitted, but seller must use their own photographs and credit must be given to Two of Wands as the designer.


