
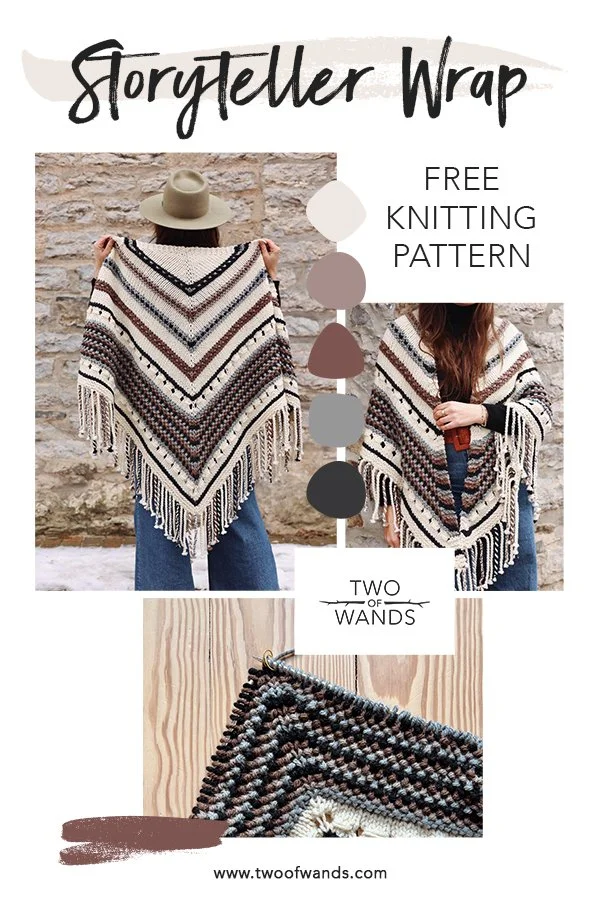
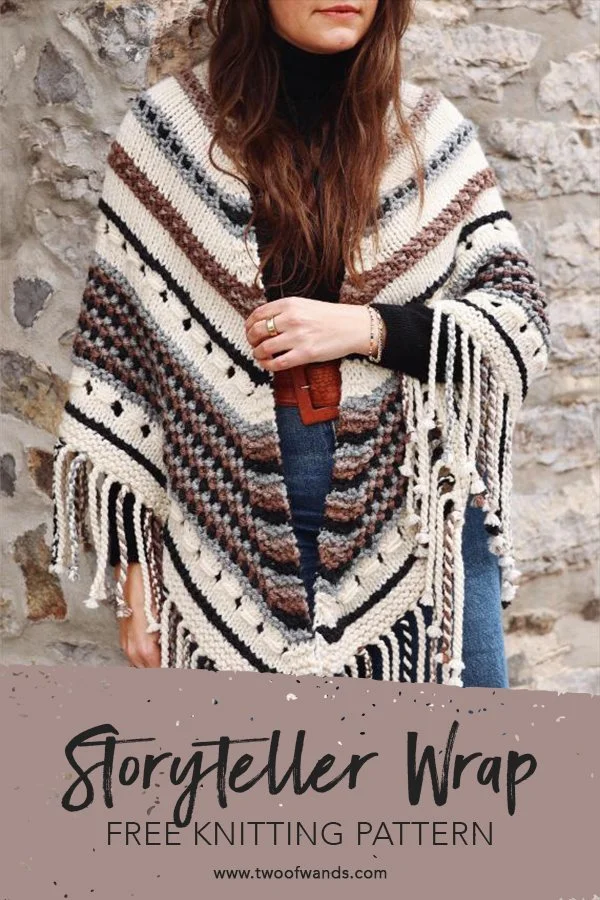
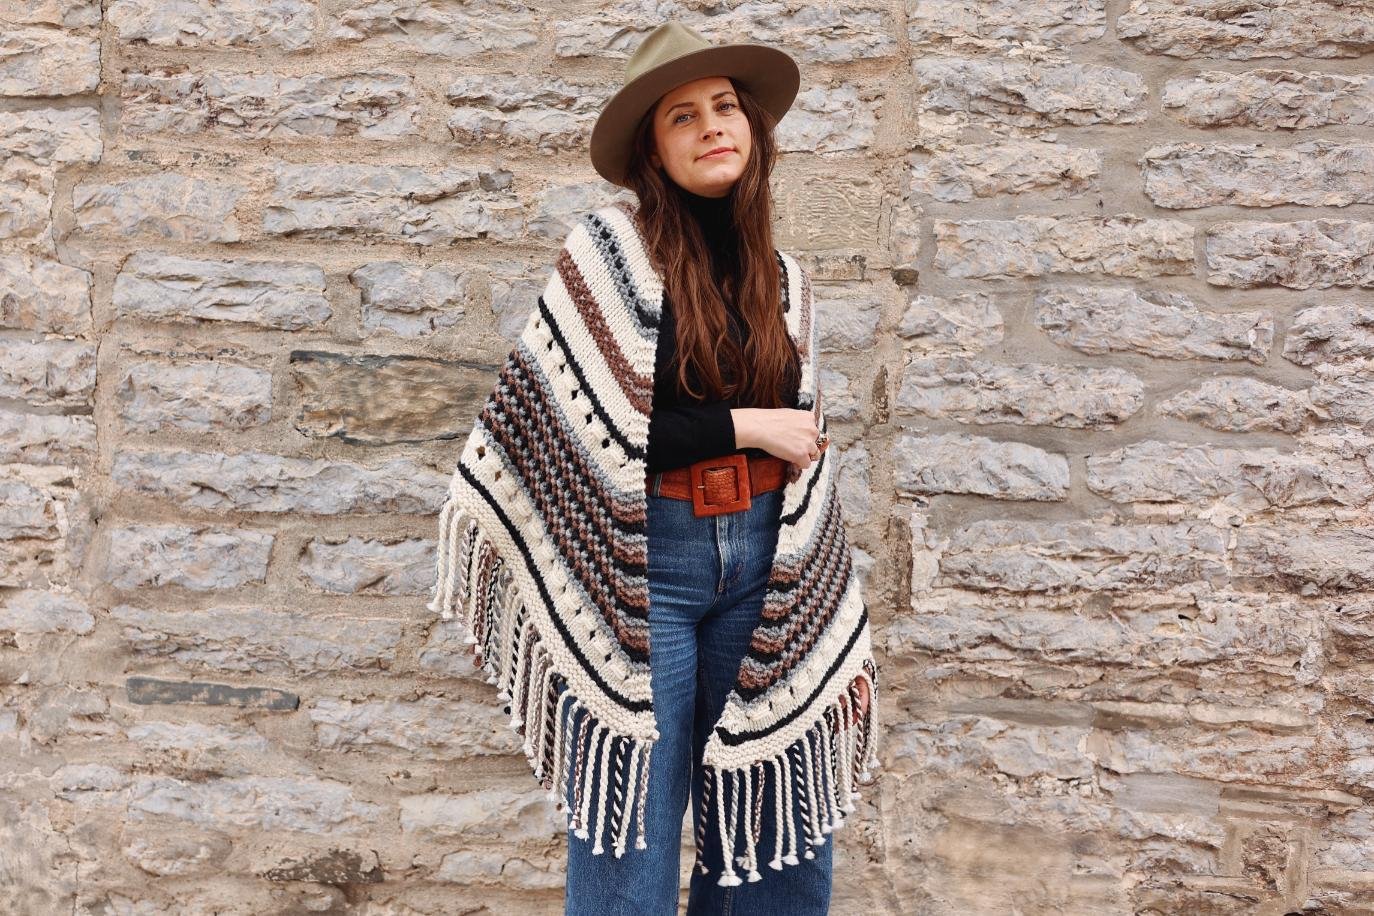
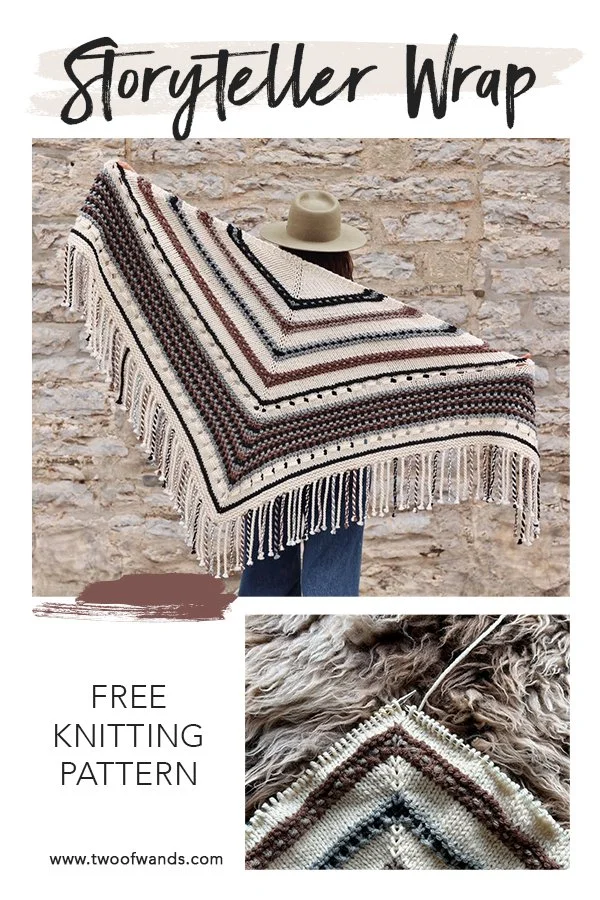
Storyteller Wrap
I’m so thrilled with the enthusiasm over the new Genres MAL, and I can’t wait for everyone to get started! Today the patterns for both wraps are available here on the blog in advance of the official March 10 start date so you can start familiarizing yourself with the techniques. There are video tutorials accompanying each section which will be released throughout the MAL, but if there are any skills you want to brush up on in the meantime, going over the pattern ahead of time is always a good idea. Scroll down for the free Storyteller Wrap pattern, purchase a printer-friendly PDF of the pattern here, or purchase the kit with all the yarn you’ll need plus a PDF of the pattern here. PS purchasing the PDF pattern or the kit also gets you a free download of the welcome packet which includes all of the genres mood boards, calendar, quick links, and more in a nicely formatted PDF!
Looking for the crochet version? Check out the Book Club Wrap here.
Lastly, check back on March 10 when the first video tutorial for this project will be added to this blog post. In the meantime, focus on choosing your genre and color combo and gathering your supplies :) For the full MAL calendar with tutorial release dates, keep reading!
Ready to join the MAL? Have a look at our calendar:
February 20
Kits, welcome videos, and mood boards launch
February 24
Free patterns go live on the Two of Wands blog
March 10
Official start of the MAL; video 1 for both wraps goes live
March 17
Video 2 for both wraps goes live
March 24
Video 3 for both wraps goes live
March 31
Video 4 for both wraps goes live
April 7
Video 5 and ending options video for both wraps go live
April 11
That's a wrap - share your styling + book recs
In between you can expect color combo guidance, styling tips, and a lot of fun! Checking out everyone else's color combos and progress is always one of my favorite parts of a MAL like this.. If you’d like to join us, there’s no official way to sign up - simply connect with others on Instagram using the hashtags #BookClubWrapCAL #GenresMAL and/or share your projects in the Crew of Wands Facebook group.
Before we dive in, here are some important quick links for reference:
Sign up for the Two of Wands newsletter to get all updates sent right to your inbox.
Visit the MAL blog post at any time for all info and updates.
Watch the welcome video, color combining video, and all video tutorials for the Storyteller Wrap and Book Club Wrap on the Two of Wands YouTube channel.
Purchase a kit for the Storyteller Wrap or the Book Club Wrap which includes the pattern PDF and a free welcome packet with all of the mood boards, calendar, links, and more included.
View the blog posts for the Storyteller Wrap or the Book Club Wrap.
Purchase the printer-friendly PDF patterns for the Storyteller Wrap or the Book Club Wrap and get the free welcome packet with all of the mood boards, calendar, links, and more included.
Join the Crew of Wands Facebook Page to connect with other makers participating in the MAL. Here you can share your projects, get motivated, encourage others, and get technical support.
Follow along and post your WIPs and finished pieces on Instagram. Use the hashtags #GenresMAL #StorytellerWrapKAL #BookClubWrapCAL #TwoOfWands #CrewOfWands and tag @twoofwands @lionbrandyarn

Now that the Hue + Me palette is currently 36 colors, it’s hard to highlight all of them and give them each their time to shine in a project, so being able to put together all of the color combos for this project made me so happy. For ages now I’ve been planning a project similar to this and I actually loosely designed the Storyteller and Book Club Wraps in the summer of 2021 when there were only 24 colors. I had the names and the concept but not many of the details. I’m so glad I waited until now to carry it out as having such a robust palette of colors to work with really let me play with the genres inspiration and put together a wide array of options. I know knitters and crocheters are often book lovers as well, and I wanted this project to be truly special, so creating a large number of combinations and mood boards was high on my priority list. This allowed me to showcase how truly mix-and-matchable the Hue + Me palette is while also speaking to as many genres as possible.
After the success of the Color Theory Vista and Landscape Wraps CAL/KAL last summer, I knew triangle wraps were a great choice for a make-along like this. They are a big blank canvas you can really do anything with, and because they're not a shaped and graded garment, it's much easier to apply a tapestry of textures and colorwork to them. Since they're a one size accessory, it also means everyone has the same amount of work in the same timeframe and they can easily be gifted. My favorite construction for a wrap is a top-down, center-out triangle because I love the multiple ways to style it. If you’re a fan of this construction as well, check out some of my other favorite crochet wraps here:

A free version of this pattern can be found on my blog here.
Knit your favorite landscape into this meditative wrap designed to represent the view that lights you up. Whether it’s the calming horizon of your home or a faraway vision in your dreams, choose a color palette that speaks to your soul and indulge in the simple stitches and textures that transport you there.
Shop the full kit here.
SIZES
One size
FINISHED DIMENSIONS
Width across top: 72”/183cm
Length to point: 33”/84cm
DIFFICULTY LEVEL
Easy
SKILLS
Knitting
Purling
M1r and m1l increases
YO increase
K3tog tbl decrease
Changing colors in stripes
All Two of Wands patterns are written in standard US terms.
SELLING FINISHED ITEMS
Small batch sales of finished pieces made from this pattern are permitted, but seller must use their own photographs and credit must be given to Two of Wands as the designer.
The pattern and photographs of this design are the property of Two of Wands and are for personal, non-commercial use only. These files are protected by US copyright, and you may not distribute or sell them electronically or physically.
HELP
Join the Crew of Wands Facebook group to connect with other makers of Two of Wands patterns for help with techniques and pattern related questions.

You can find a free version of this pattern on the blog here.
Whether you’re warming up to a hot cup of joe or popping in to cool off with an iced coffee, the Coffee Shop Wrap has you covered - literally. The cooling cotton won’t overheat you but the enveloping size and triangle shape is the perfect light layer for an air conditioned space. Wear it wrapped like a scarf in front or draped over your shoulders for two different looks.
This pattern is part of a collaboration with Lion Brand Yarn Company using their 24/7 Cotton yarn. To purchase a kit please visit their site here.
This is an easy level knitting pattern and the techniques involved are knit, k2tog, and yarn over.
Dimensions of finished item:
Width: 86”/218cm
Length from top to point: 32”/81cm
*A link to download the pattern will be sent upon payment completion. This link will expire after 24 hrs.
All patterns are written in standard US terms.
The pattern and photographs of this garment are the property of Two of Wands. This pattern and design are subject to copyright, and are for personal, non-commercial use only. You may not distribute or sell this pattern or any items created using the directions in this pattern.

You can find a free version of this pattern on the blog here.
+ DESCRIPTION
Elevate any outfit in airy luxury with the Cambria Wrap whether you’re wearing it to cover chilly shoulders as a wrap or to accent your ensemble as a scarf. The lightweight and oversized qualities make it perfect for everyday wear, and the lace detailing keeps it looking chic and sophisticated.
This pattern is part of a collaboration with Lion Brand Yarn Company using their Touch of Alpaca yarn. To purchase a kit please visit their site here.
+ SKILLS
This is an intermediate level knitting pattern and the techniques involved are the knit stitch, purl stitch, k2tog and ssk decreases, yarn over increases, and working simple lace repeats.
All patterns are written in standard US terms.
+ SIZING
Width: 90”/229cm
Length to point: 34”/86cm
*A link to download the pattern will be sent upon payment completion. This link will expire after 24 hrs.
The pattern and photographs of this garment are the property of Two of Wands. This pattern and design are subject to copyright, and are for personal, non-commercial use only. You may not distribute or sell this pattern or any items created using the directions in this pattern without consent. For more information, please visit the policies here.

Don’t head out the door without the Sophomore Wrap! This triangular thermal beauty is a step above the rest when it comes to sophistication and functionality. The delightfully textured fabric is as addicting to knit as the oversized versatile shape is to wear.
Shop the full kit here.
SIZES
One size
FINISHED DIMENSIONS
Width: 72”/183cm
Length to point: 34”/86.5cm
DIFFICULTY LEVEL
Easy
SKILLS
Knitting and purling
M1l and m1r increases
All Two of Wands patterns are written in standard US terms.
SELLING FINISHED ITEMS
Small batch sales of finished pieces made from this pattern are permitted, but seller must use their own photographs and credit must be given to Two of Wands as the designer.
The pattern and photographs of this design are the property of Two of Wands and are for personal, non-commercial use only. These files are protected by US copyright, and you may not distribute or sell them electronically or physically.
HELP
Join the Crew of Wands Facebook group to connect with other makers of Two of Wands patterns for help with techniques and pattern related questions.
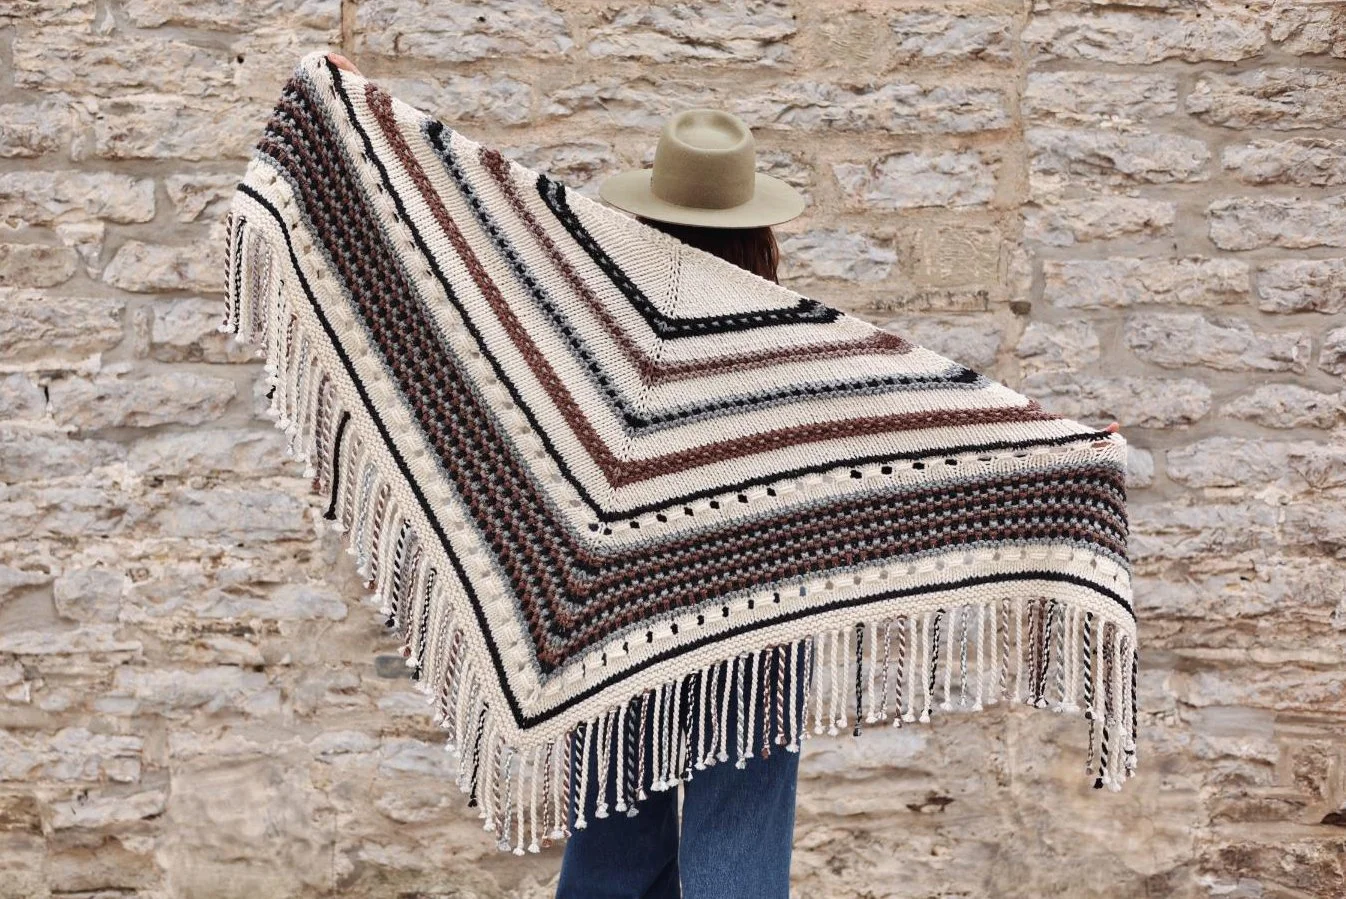
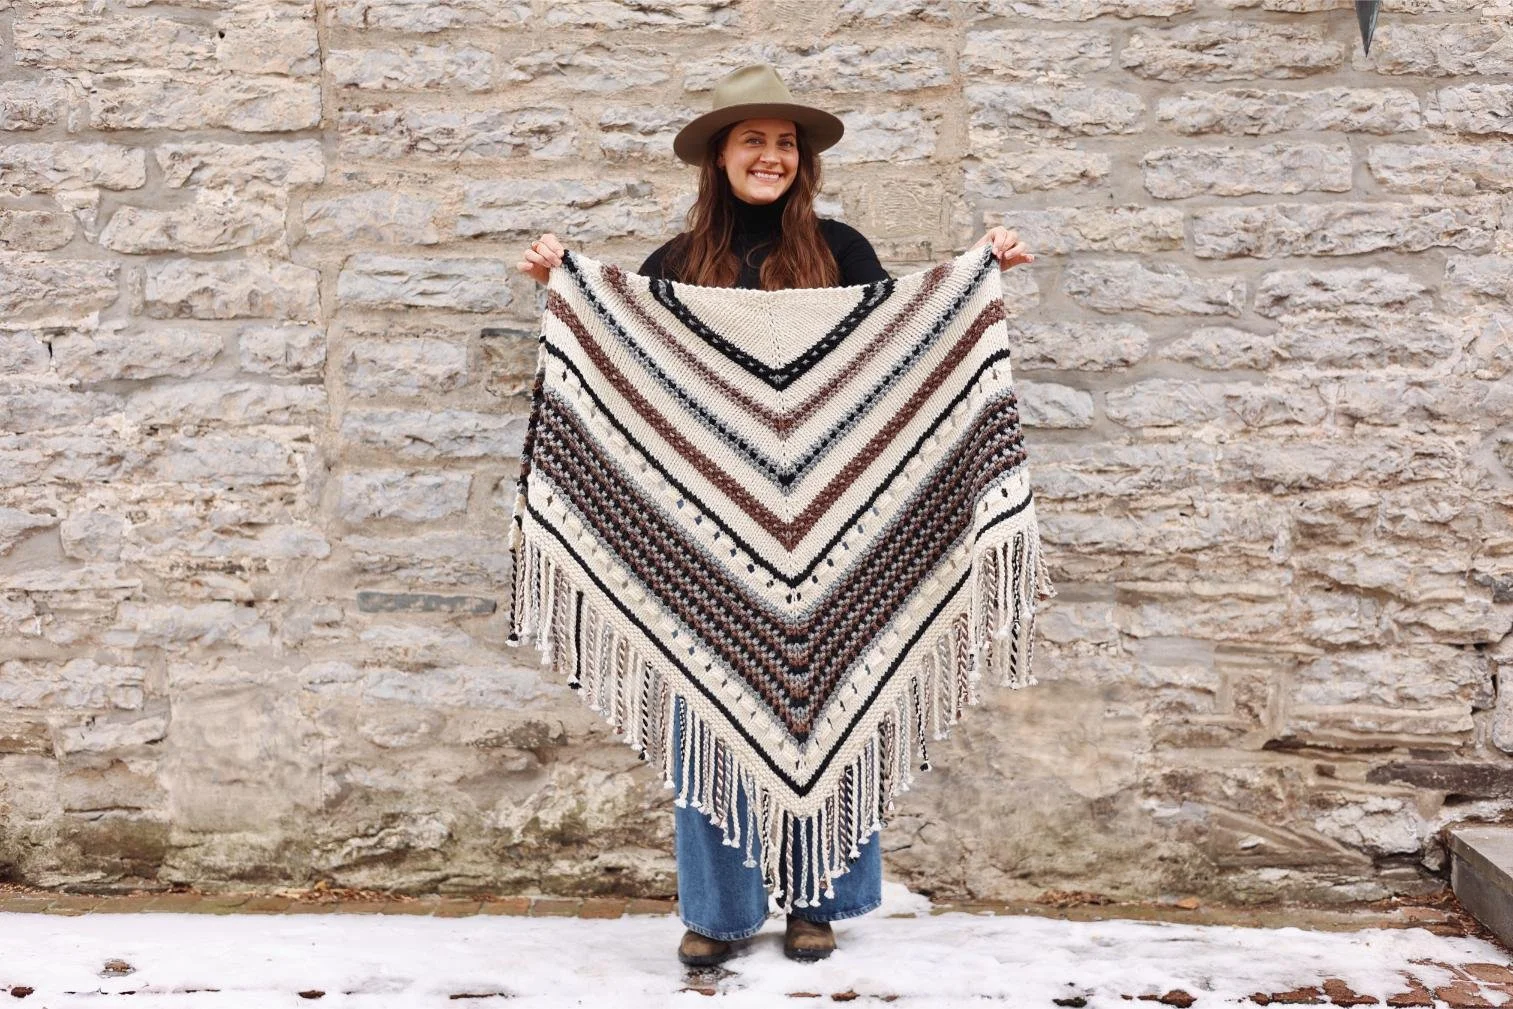
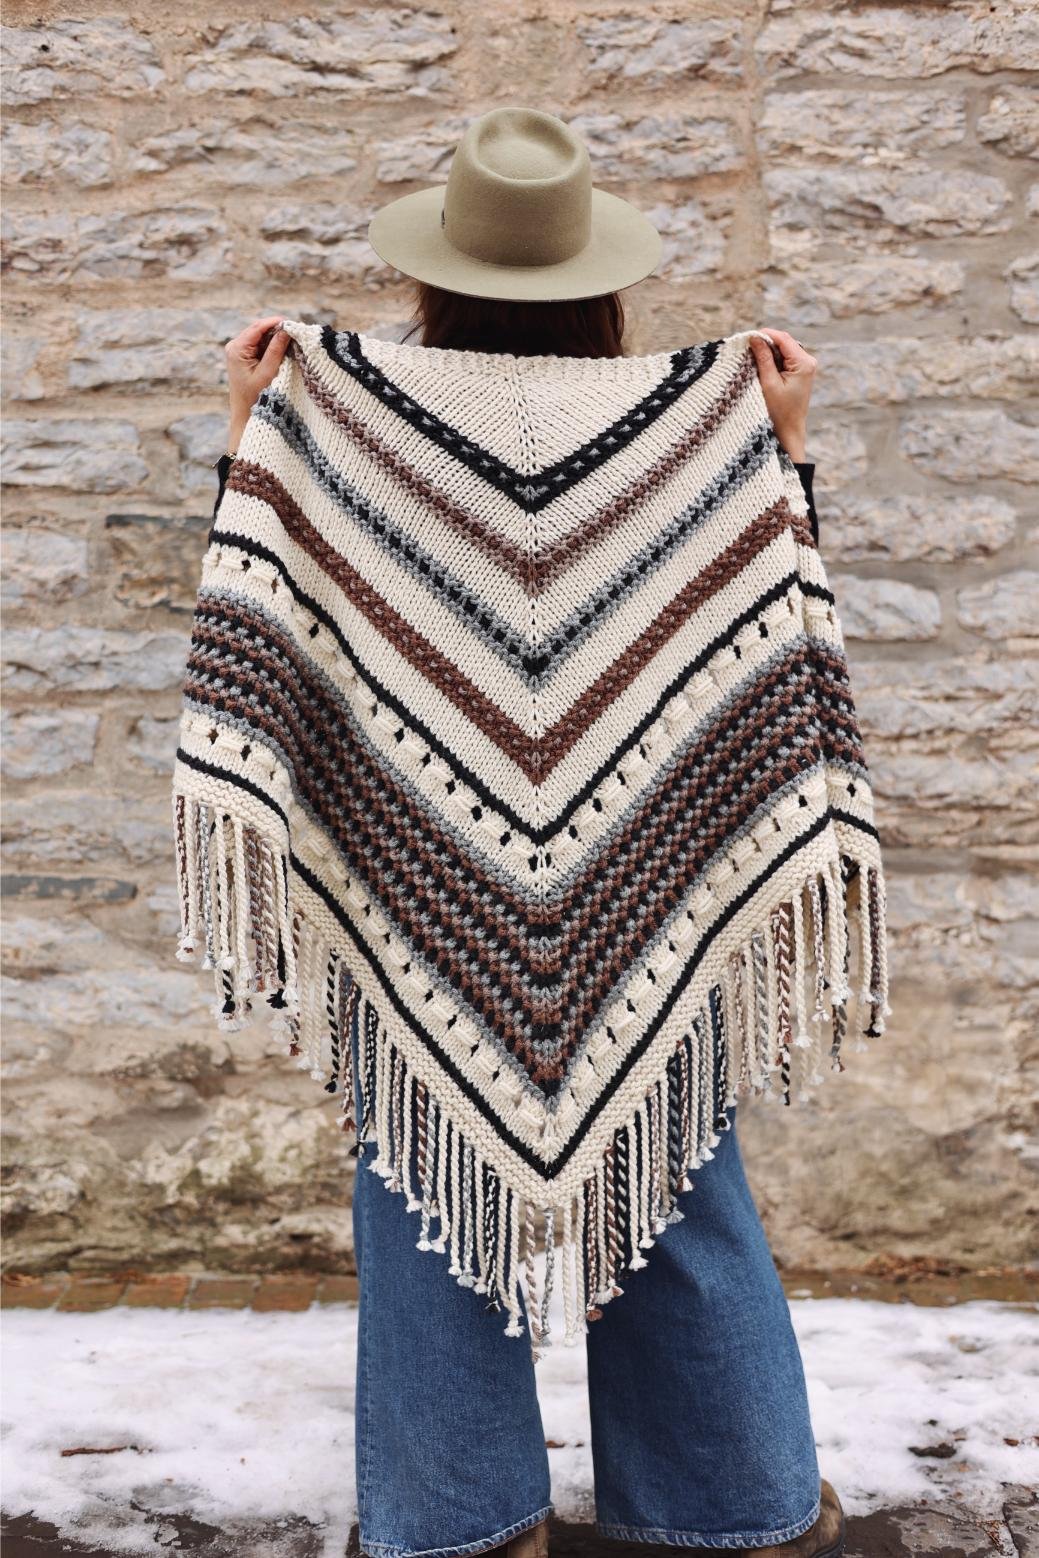
The Storyteller Wrap is rich with elaborate textures and colorwork as I really wanted these wraps to tell a story and include tons of symbolism and nods to the inspiration of books. I even changed some of the language and terms in the project to suit the inspo as well. For example, I’ve been referring to the main color as the main character and to the contrast colors as the supporting roles. I love these references because that’s exactly what colors are in a knit or crochet piece! Just like the perspective of the main character of a story really sets the tone, the same is true for the main character of your wrap. Changing main characters even with the same five-color combo can completely alter the overall look and mood of the wrap. Have a look at the gallery below - even in yarn form before any stitches are made, you can click through to see how the color proportion changes the composition as you switch main characters.


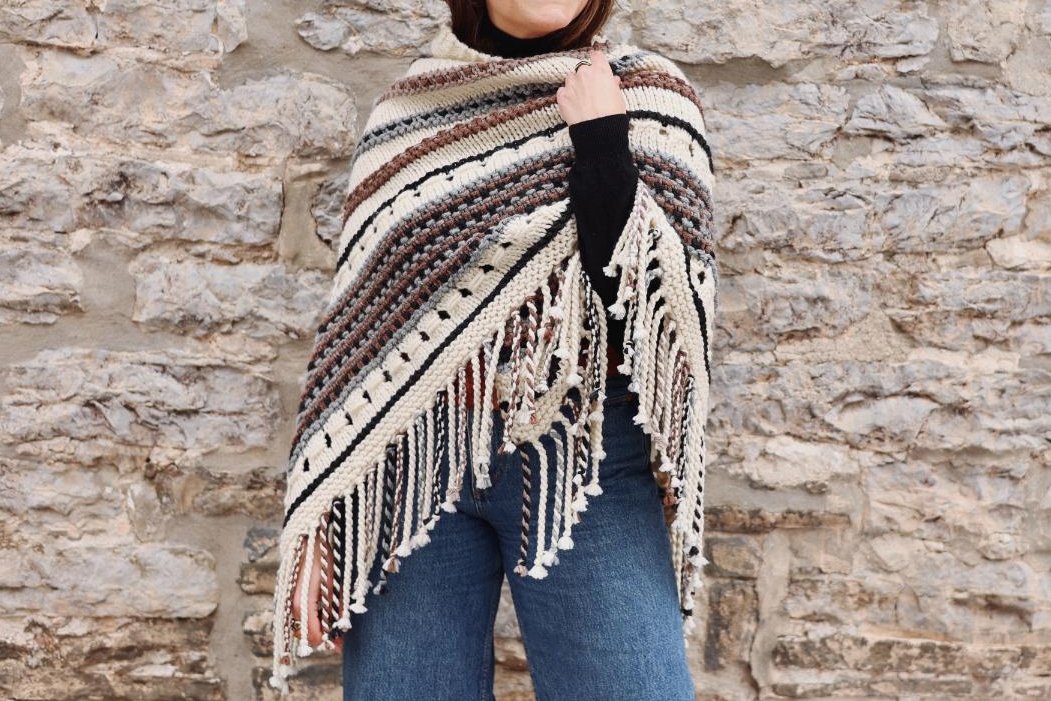
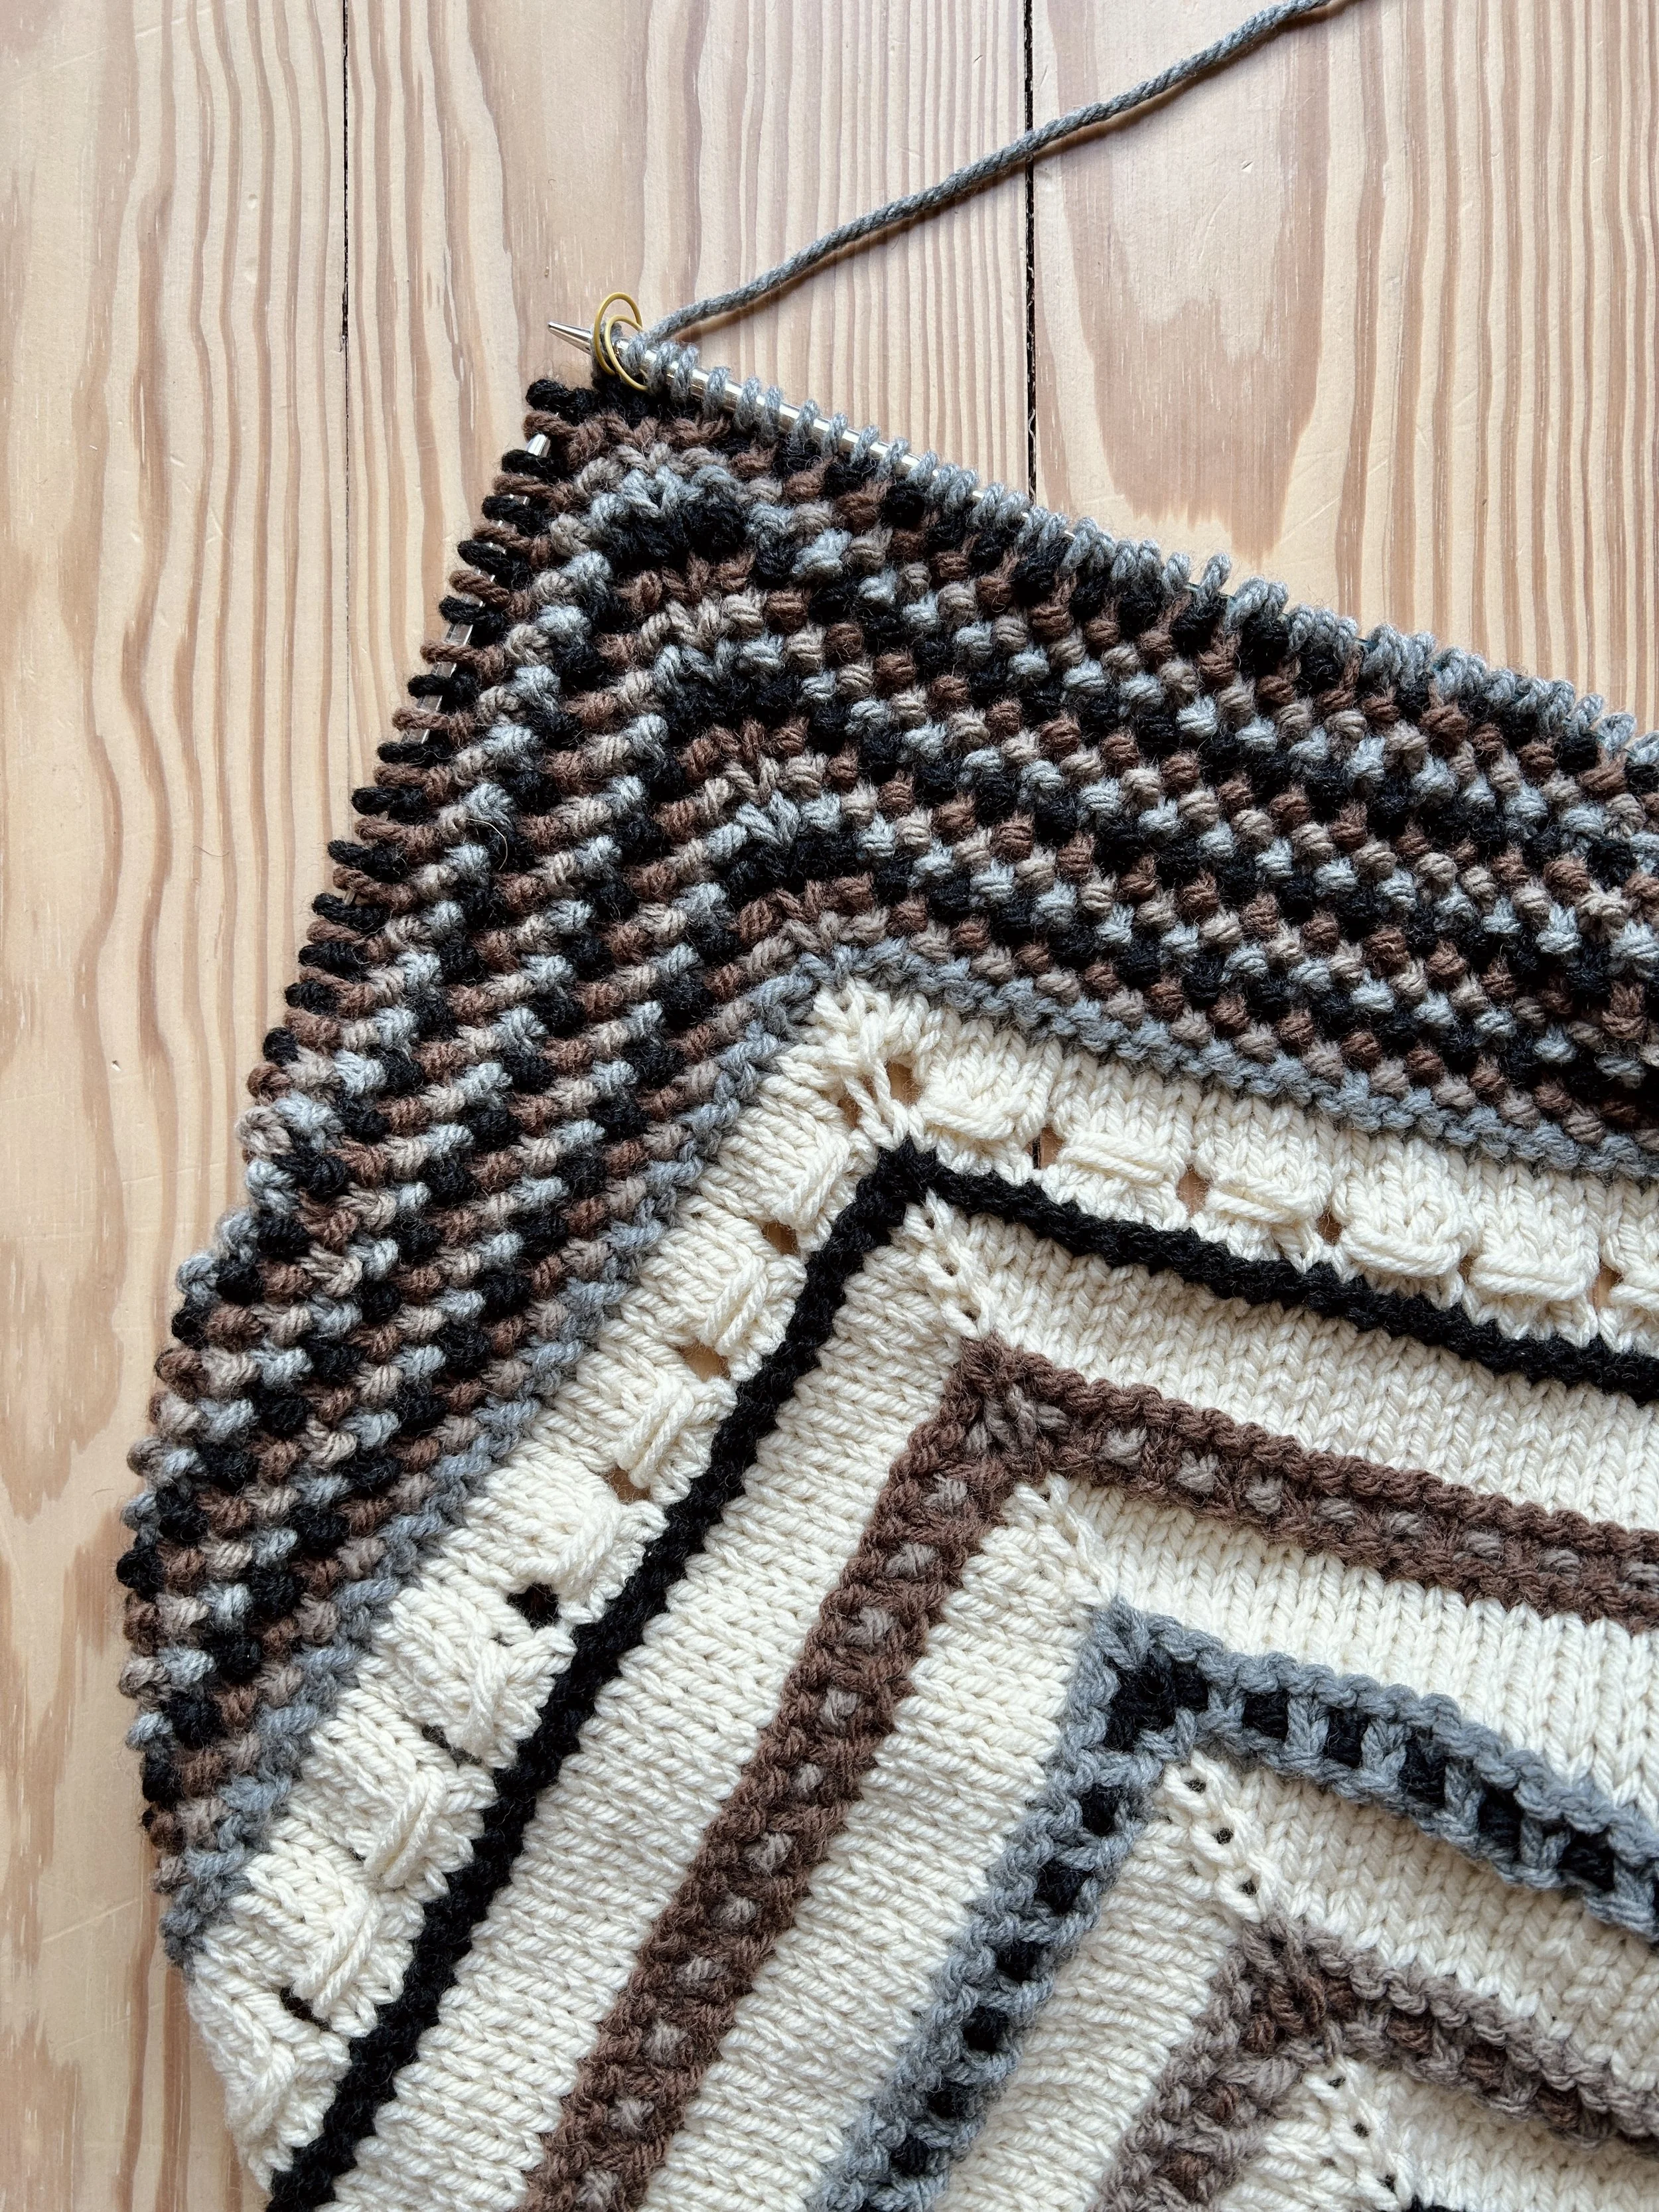
As we begin working on the wrap, we first meet our main character, then we get introduced to the supporting roles which dance across the backdrop of the main character together in different combos to show their various relationships. These colorwork stripes were also inspired by stacks of books on a shelf in a library. Then all of the characters come together for the climax of the story, represented in a beautiful colorwork band toward the bottom of the wrap, which is flanked by a series of wrapped stitches that are meant to symbolize book covers wrapping around the text. Finally, the wraps get topped off with one of three accent options - traditional fringe, twisted fringe, or tassels. You get to choose how your story ends!
One of my favorite parts of the MAL though has got to be the gorgeous color combos and their mood boards. I put together 35 curated options and pulled inspo to really set the mood of the genre they are inspired by so you can connect to the vibe as much as possible. I know 35 options sounds like a lot but did you know there are 376,992 ways to put together a five-color combo with the 36-color Hue + Me palette?! Trust me when I say narrowing that down to 35 was not for the faint of heart, lol. Since there are so many options, there may be a combo not represented in the 35 genres that you really want to use, and that’s ok too! There are no rules here! If you want to get some insight into all of the genres and mood boards and colors in the Hue + Me palette, check out my color combining video for the MAL here:
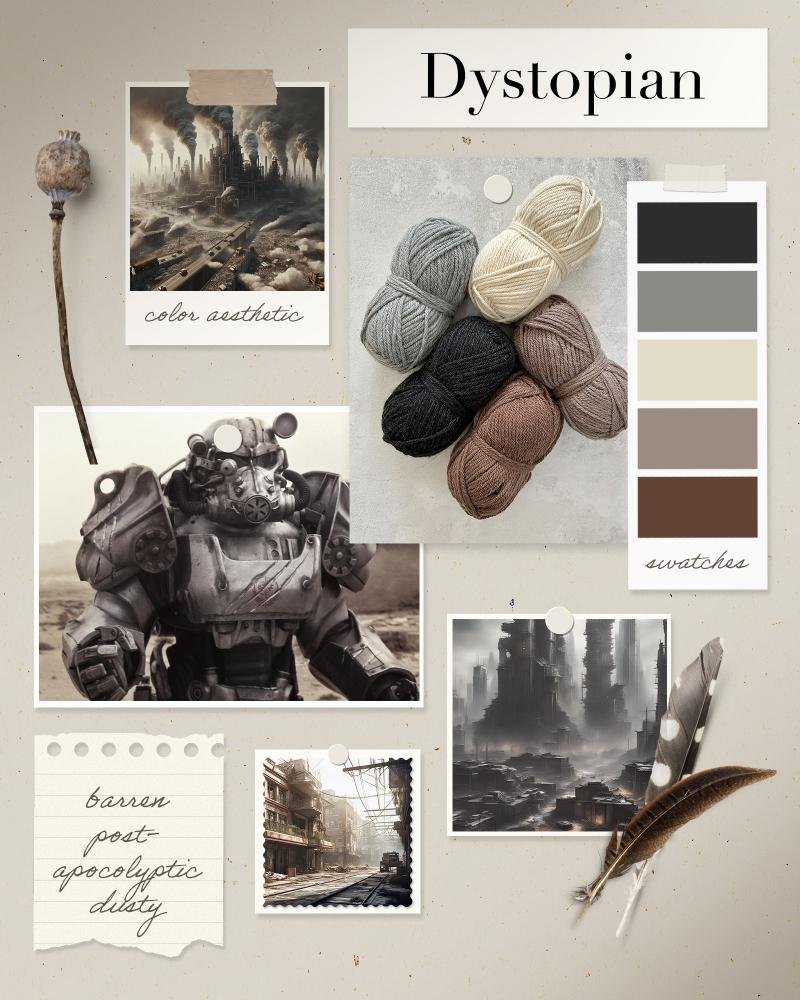
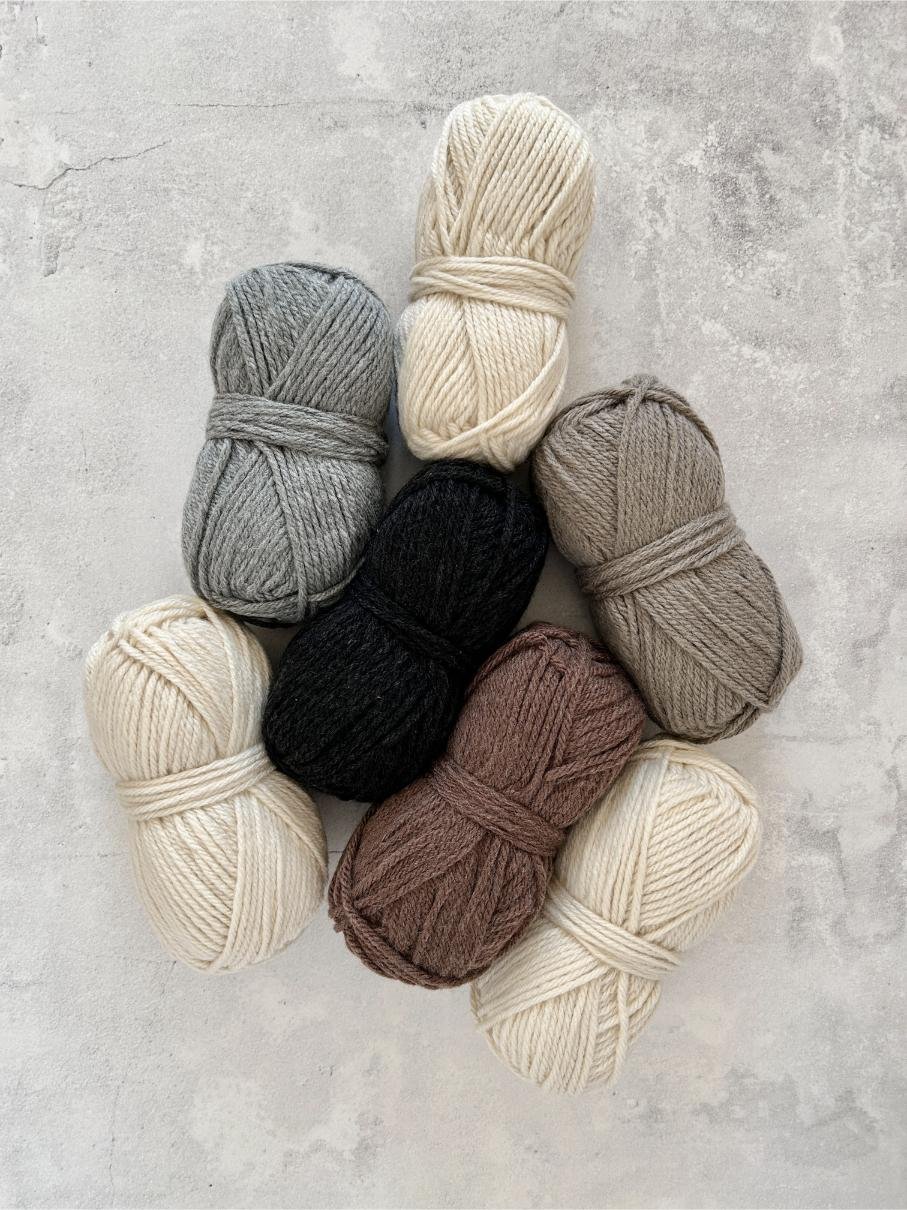
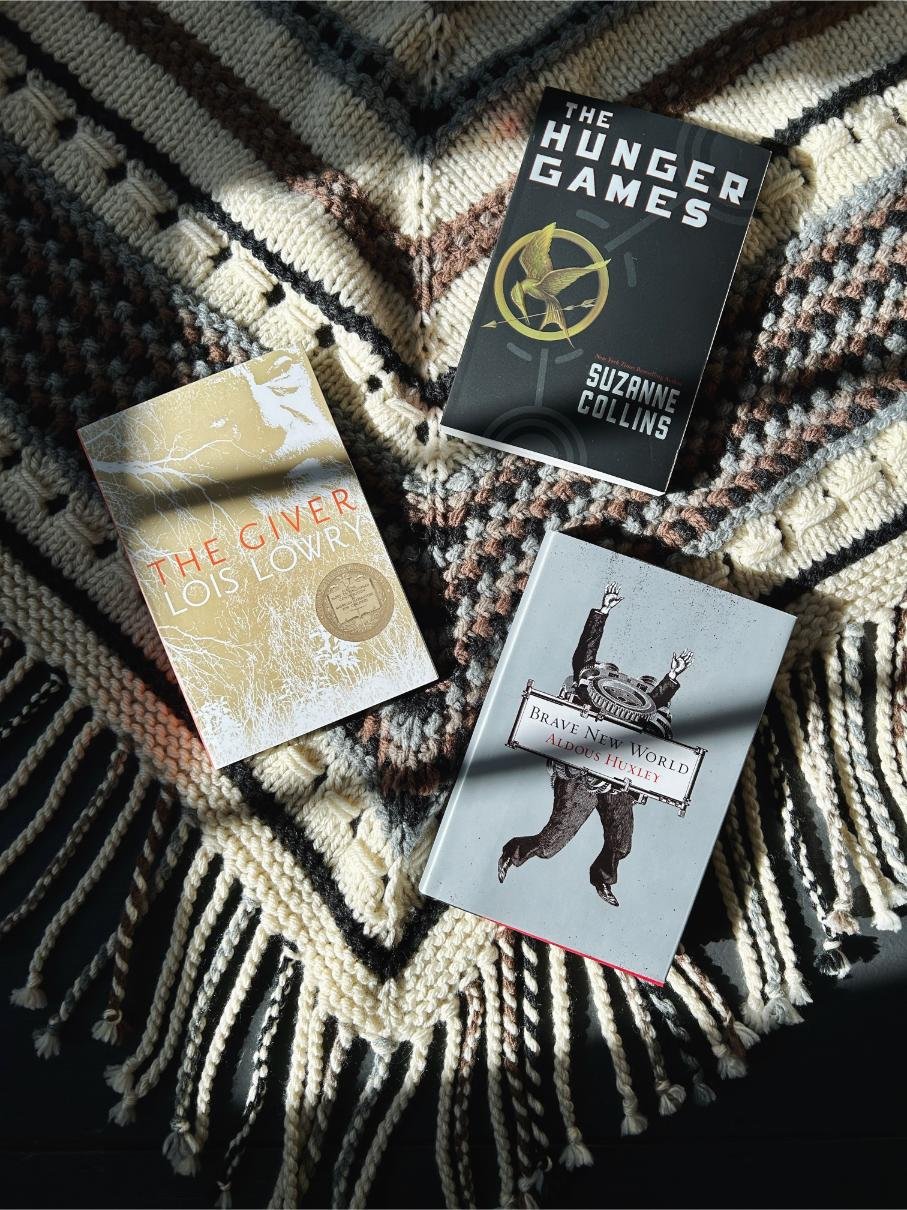
For my Storyteller Wrap, I opted for the Dystopian genre. I wouldn't say this is my favorite book genre, but I am a neutrals lover at heart and I love this color combo so much because although it's all neutrals, the combination of warm and cool tones in it gives it beautiful contrast and depth. The dystopian theme evokes images of barren land (represented by Macchiato and Warm Stone), as well as ramshackle technology and weaponry made with scraps of metal (represented by Salt, Cement, and Werewolf). Even though dystopian novels aren't my all-time fave, I've always loved the book The Giver by Lois Lowry and when I looked at the other books in this genre on my shelves, they all had a similar color theme to the combination I put together!
This is an intermediate level knitting pattern, and the techniques involved are knitting and purling, m1l and m1r increases, slipping stitches, yarn overs, k2tog decreases, and wrapped stitches. Once again, video tutorials will be added to this post throughout the course of the MAL so make sure to check back! If you run into trouble and need assistance, be sure to join the Crew of Wands Facebook page where those who use my patterns can share their projects, connect, and provide help to each other.
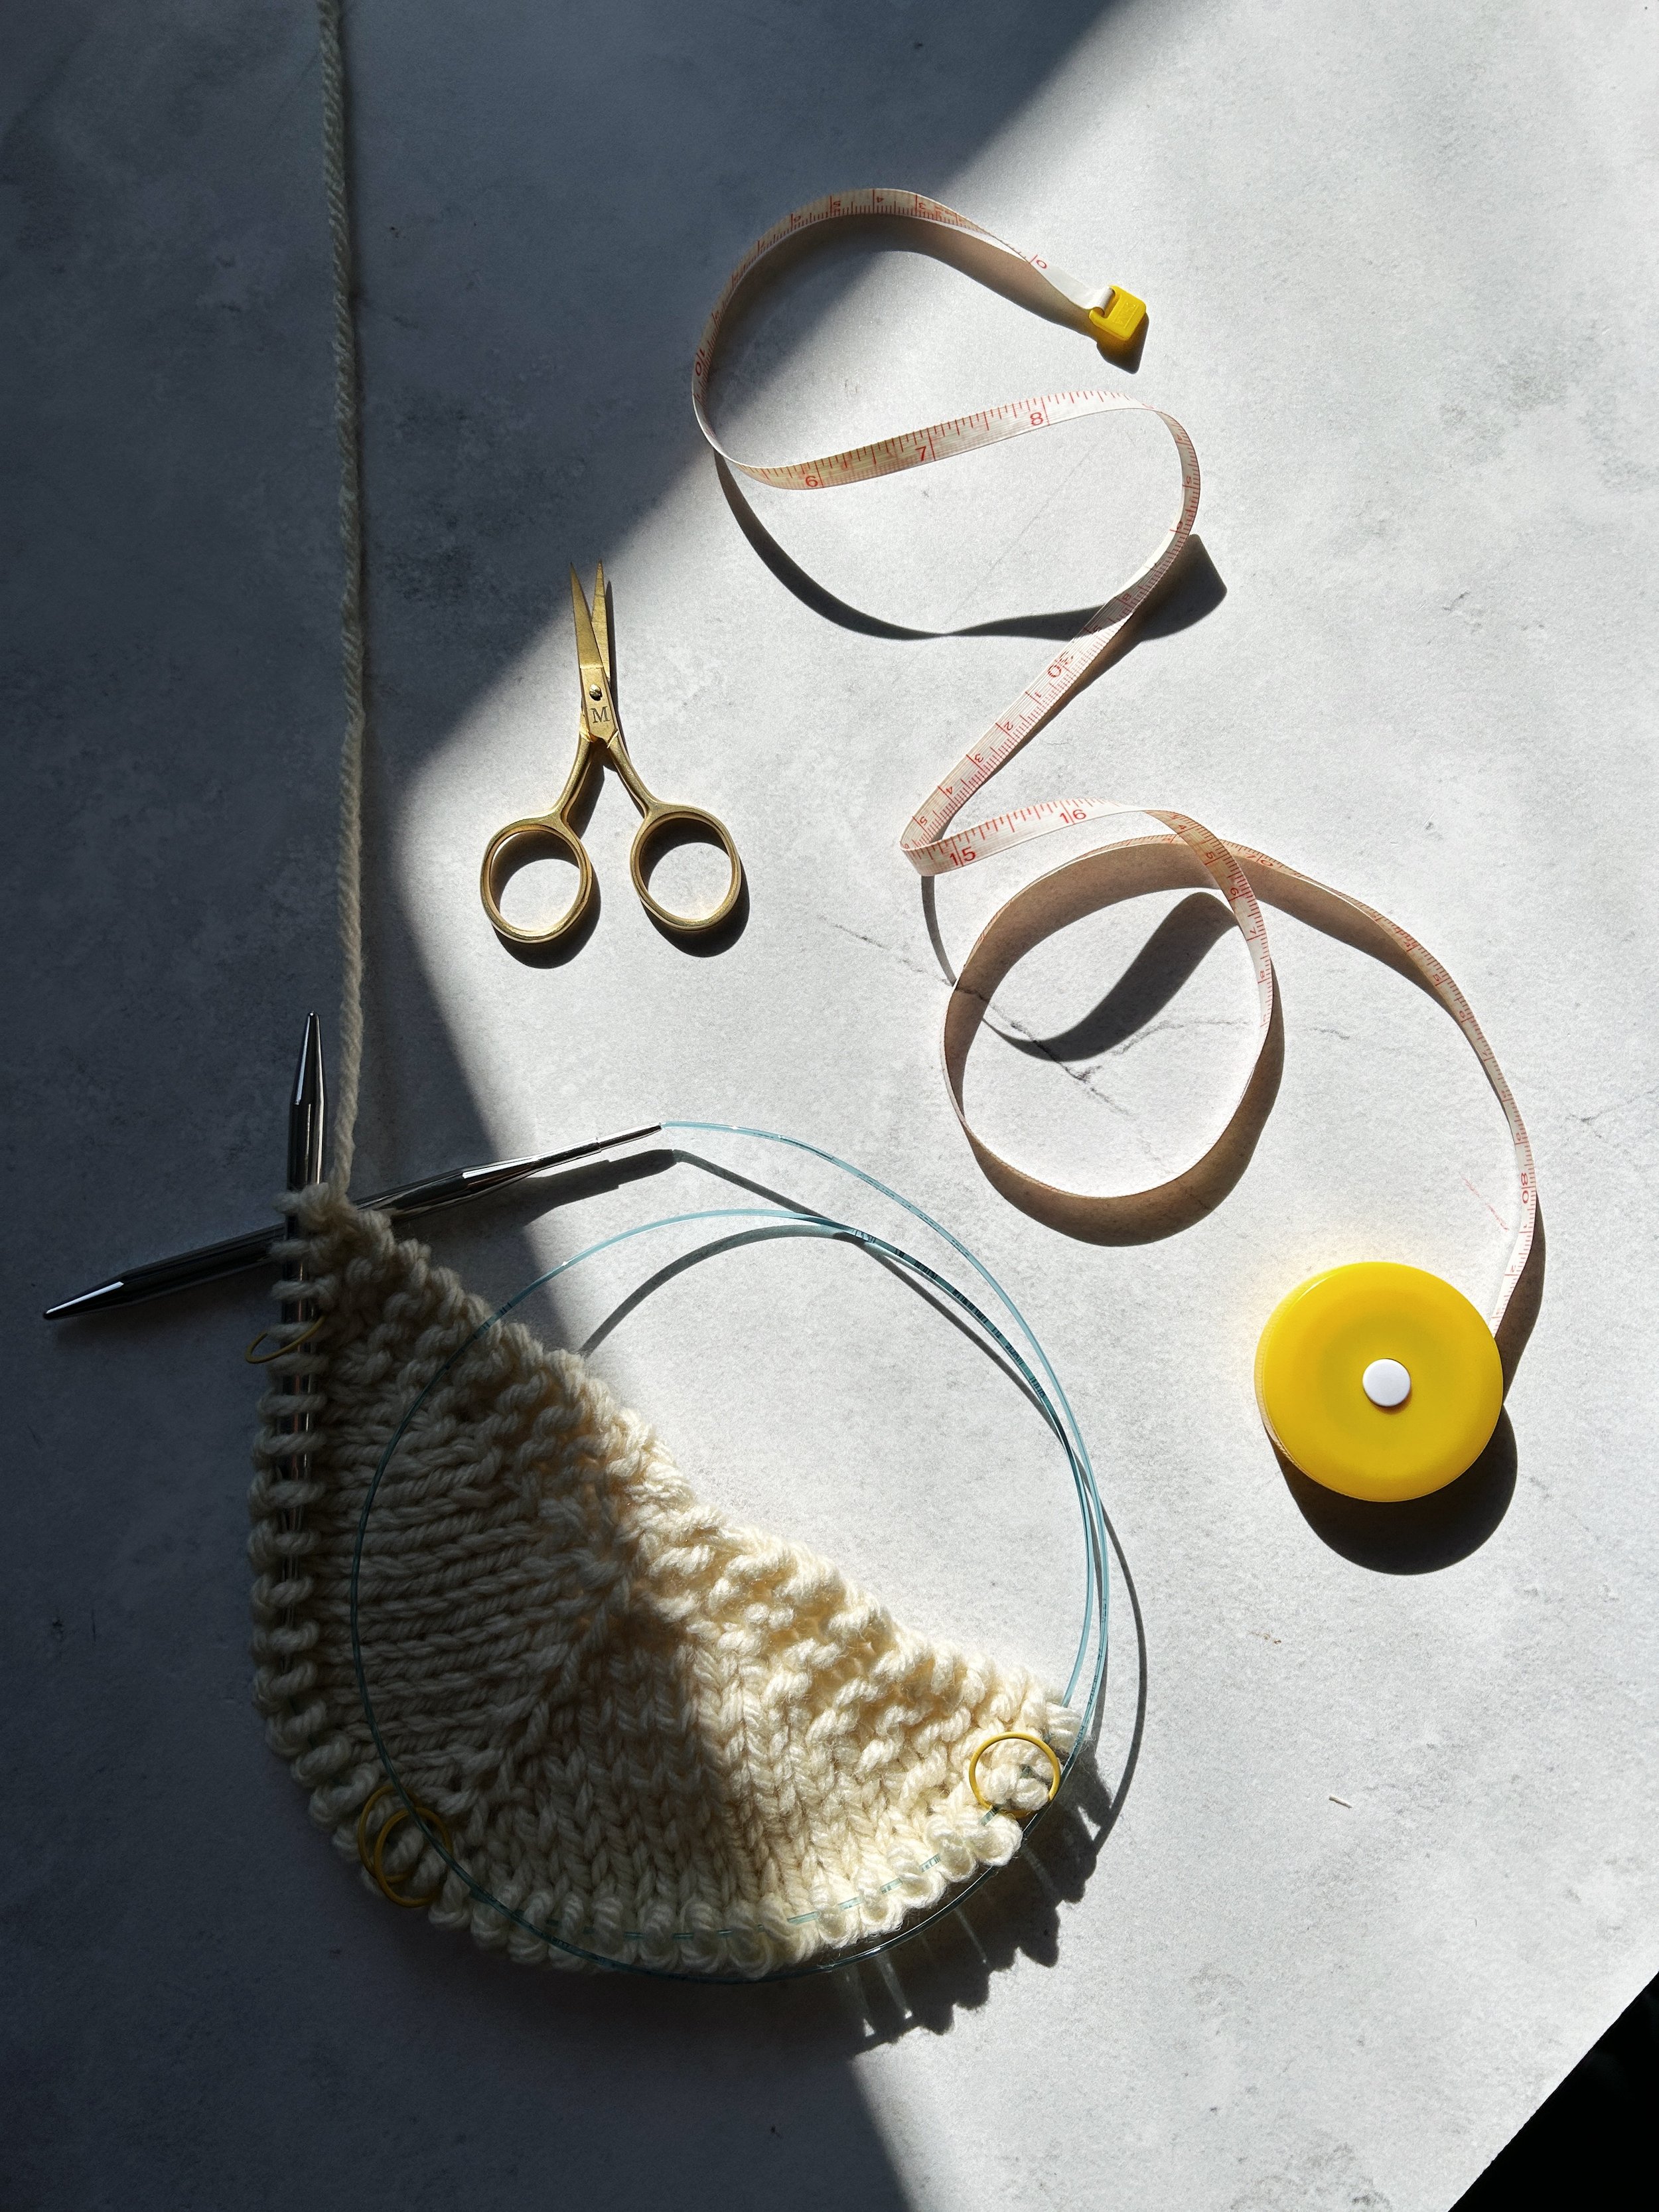
MATERIALS
3 skeins Lion Brand Hue + Me in Salt (617-098AS) for main color
1 skein each Lion Brand Hue + Me in Werewolf (617-152AB), Cement (617-149AV), Warm Stone (617-125AI), and Macchiato (617-126AI) for contrast colors 1, 2, 3, and 4
(bulky, weight 5; 137yds/125m per skein)
Size US 11 (8mm) circular knitting needles, 40”/100cm or longer
Stitch markers or scrap yarn
Tapestry needle
Crochet hook (optional) to attach fringe
GAUGE
10.5 sts + 16 rows = 4”/10cm in stockinette
FINISHED DIMENSIONS
Width across top: 70”/178cm
Length to point: 33”/84cm
ABBREVIATIONS
*All Two of Wands patterns are written in standard US terms.
CC – contrast color
CO – cast on
K – knit
K2tog – knit 2 together
M1l – make 1 left
M1r – make 1 right
MC – main color
P – purl
Pm – place marker
Rep – repeat
RS – right side
Sl – slip
Sm – slip marker
St(s) – stitch(es)
WS – wrong side
Wyib – with yarn in back
Yb – move yarn backward
Yf – move yarn forward
YO – yarn over
Notes: Wrap is worked from the top down, increasing 4 sts on every right side (even) row after the set up rows. Pattern is composed of sections of stockinette, colorwork stripes, wrapped stitches, and a colorwork band. All stitches are slipped purlwise. Keep a loose tension when working rows with slipped stitches to prevent pulling. Options for tassels, traditional fringe, and twisted fringe are all provided.
For color combo inspo, please visit https://www.twoofwands.com/blog/genres-mal
For video tutorials, please visit bit.ly/genresMALtutorials
PATTERN
With MC, CO 5 sts.
Set up rows:
Row 1 (WS): K 2, pm, P 1, pm, K 2.
Row 2 (RS): K 2, m1r, sm, K 1, sm, m1l, K 2. (7 sts)
Row 3: K to marker, sm, P 1, sm, K to end of row.
Row 4: K 2, m1l, K 1, m1r, sm, K 1, sm, m1l, K 1, m1r, K 2. (11 sts)
Row 5: K 3, pm, P 2, sm, P 1, sm, P 2, pm, K 3.
Stockinette section 1:
Row 6 (RS): K to marker, sm, m1l, K to marker, m1r, sm, K 1, sm, m1l, K to marker, m1r, sm, K to end of row. (15 sts)
Row 7 (WS): K to marker, sm, P to marker, sm, P 1, sm, P to marker, sm, K to end of row.
Rows 8-19: Rep rows 6 and 7, 6 times. (39 sts)
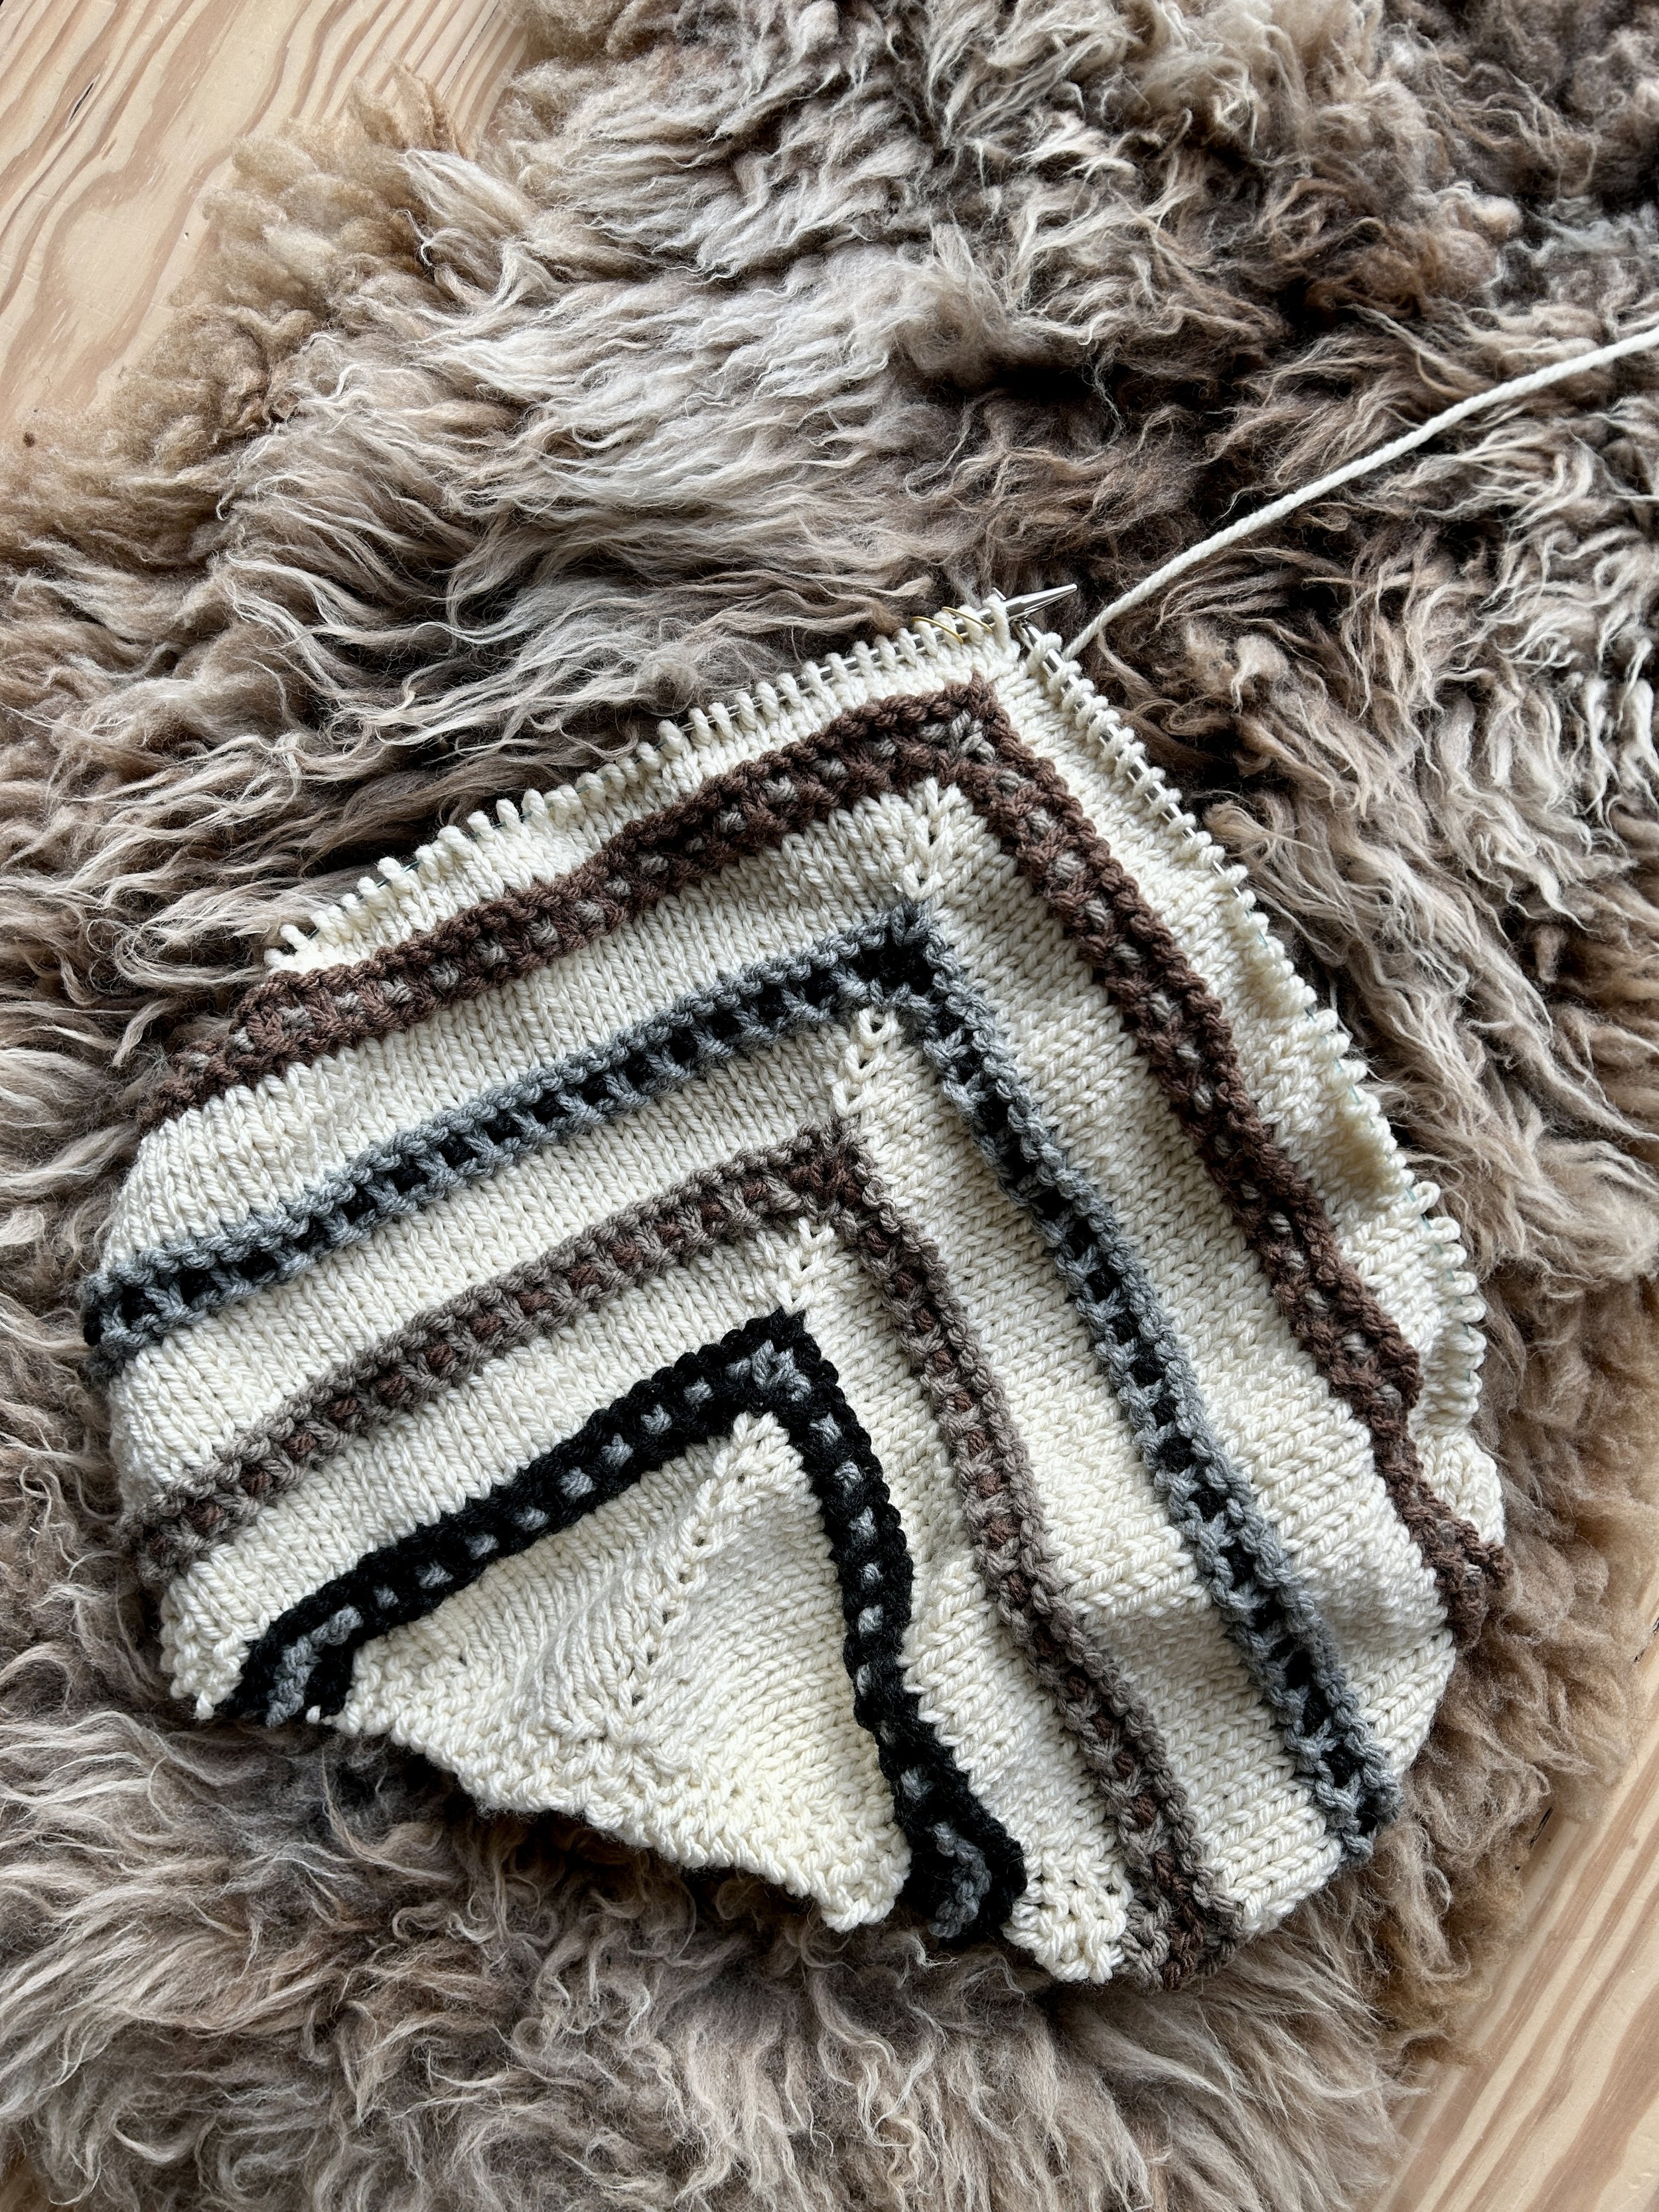
Colorwork stripe 1:
Note: Work loosely throughout this section to prevent floats behind sl sts from tightening the work.
Change to CC1 and cut MC.
Row 20 (RS): K to marker, sm, m1l, K to marker, m1r, sm, K 1, sm, m1l, K to marker, m1r, sm, K to end of row. (43 sts)
Row 21 (WS): K to marker, sm, K to marker, sm, P 1, sm, K to marker, sm, K to end of row.
Change to CC2 but do not cut CC1.
Row 22: K to marker, sm, m1l, *K 1, sl 1 wyib, rep from * to marker, m1r, sm, K 1, sm, m1l, **sl 1 wyib, K 1, rep from ** to marker, m1r, sm, K to end of row. (47 sts)
Row 23: K to marker, sm, K 2, *sl 1 wyif, K 1, rep from * to marker, sm, P 1, sm, *K 1, sl 1 wyif, rep from * to 2 sts before marker, K 2, sm, K to end of row.
Change to CC1 and cut CC2.
Rows 24+25: Rep rows 20 and 21. (51 sts)
Stockinette section 2:
Change to MC and cut CC1.
Row 26 (RS): K to marker, sm, m1l, K to marker, m1r, sm, K 1, sm, m1l, K to marker, m1r, sm, K to end of row. (55 sts)
Row 27 (WS): K to marker, sm, P to marker, sm, P 1, sm, P to marker, sm, K to end of row.
Rows 28-31: Rep rows 26 and 27, 2 times. (63 sts)
Colorwork stripe 2:
Rows 32-37: Work as for colorwork stripe 1 rows 20-25, replacing CC1 with CC3 and CC2 with CC4. (75 sts)
Stockinette section 3:
Rows 38-43: Work as for stockinette section 2 rows 26-31. (87 sts)
Colorwork stripe 3:
Rows 44-49: Work as for colorwork stripe 1 rows 20-25, replacing CC1 with CC2 and CC2 with CC1. (99 sts)
Stockinette section 4:
Rows 50-55: Work as for stockinette section 2 rows 26-31. (111 sts)
Colorwork stripe 4:
Rows 56-61: Work as for colorwork stripe 1 rows 20-25, replacing CC1 with CC4 and CC2 with CC3. (123 sts)
Stockinette section 5:
Rows 62-67: Work as for stockinette section 2 rows 26-31. (135 sts)
Garter stripe 1:
Change to CC1 but do not cut MC.
Row 68 (RS): K to marker, sm, m1l, K to marker, m1r, sm, K 1, sm, m1l, K to marker, m1r, sm, K to end of row. (139 sts)
Row 69 (WS): K to marker, sm, K to marker, sm, P 1, sm, K to marker, sm, K to end of row.
Wrapped stitches section 1:
Change to MC and cut CC1.
Row 70 (RS): K to marker, sm, m1l, K to marker, m1r, sm, K 1, sm, m1l, K to marker, m1r, sm, K to end of row. (143 sts)
Row 71 (WS): K to marker, sm, P to marker, sm, P 1, sm, P to marker, sm, K to end of row.
Note: Work wraps on the following row loosely to prevent pulling.
Row 72: K to marker, sm, ml1, *YO, K 1, K2tog, K 1, yf, sl 3 sts from right needle to left needle, yb, sl 3 sts back to right needle, yf, sl 3 sts back to left needle, yb, sl 3 sts back to right needle, rep from * to marker, YO, sm, K 1, sm, YO, **K 1, K2tog, K 1, yf, sl 3 sts from right needle to left needle, yb, sl 3 sts back to right needle, yf, sl 3 sts back to left needle, yb, sl 3 sts back to right needle, YO, rep from ** to marker, m1r, sm, K to end of row. (147 sts)
Row 73: Rep row 71.
Rows 74+75: Rep rows 70 and 71. (151 sts)
Colorwork band:
Change to CC2 and cut MC.
Note: Work loosely throughout this section to prevent floats behind sl sts from tightening the work.
Row 76 (RS): K to marker, sm, m1l, K to marker, m1r, sm, K 1, sm, m1l, K to marker, m1r, sm, K to end of row. (155 sts)
Row 77 (WS): K to marker, sm, K to marker, sm, P 1, sm, K to marker, sm, K to end of row.
Change to CC3 and cut CC2.
Row 78: K to marker, sm, m1l, *K 1, sl 1 wyib, rep from * to marker, m1r, sm, K 1, sm, m1l, **sl 1 wyib, K 1, rep from ** to marker, m1r, sm, K to end of row. (159 sts)
Row 79: K to marker, sm, K 2, *sl 1 wyif, K 1, rep from * to marker, sm, P 1, sm, *K 1, sl 1 wyif, rep from * to 2 sts before marker, K 2, sm, K to end of row.
Change to CC4 and cut CC3.
Rows 80+81: Rep rows 78 and 79. (163 sts)
Change to CC1 and cut CC4.
Rows 82+83: Rep rows 78 and 79. (167 sts)
Change to CC2 and cut CC1.
Rows 84+85: Rep rows 78 and 79. (171 sts)
Change to CC3 and cut CC2.
Rows 86-101: Rep rows 78-85, 2 times, changing colors every 2 rows as indicated. (203 sts)
Rows 102-107: Rep rows 78-83, changing colors every 2 rows as indicated. (215 sts)
Change to CC2 and cut CC1.
Rows 108+109: Rep rows 76 and 77. (219 sts)
Wrapped stitches section 2:
Change to MC and cut CC2.
Rows 110-115: Work as for wrapped stitches section 1 rows 70-75. (231 sts)
Garter stripe 2:
Change to CC1 but do not cut MC.
Rows 116+117: Work as for garter stripe 1 rows 68 and 69. (235 sts)
Garter section 1:
Change to MC and cut CC1.
Row 118 (RS): K to marker, sm, m1l, K to marker, m1r, sm, K 1, sm, m1l, K to marker, m1r, sm, K to end of row. (239 sts)
Row 119 (WS): K to marker, sm, K to marker, sm, P 1, sm, K to marker, sm, K to end of row.
Rows 120-123: Rep rows 118 and 119, 2 times. (247 sts)
Bind off. Block work. Secure and weave in all ends.
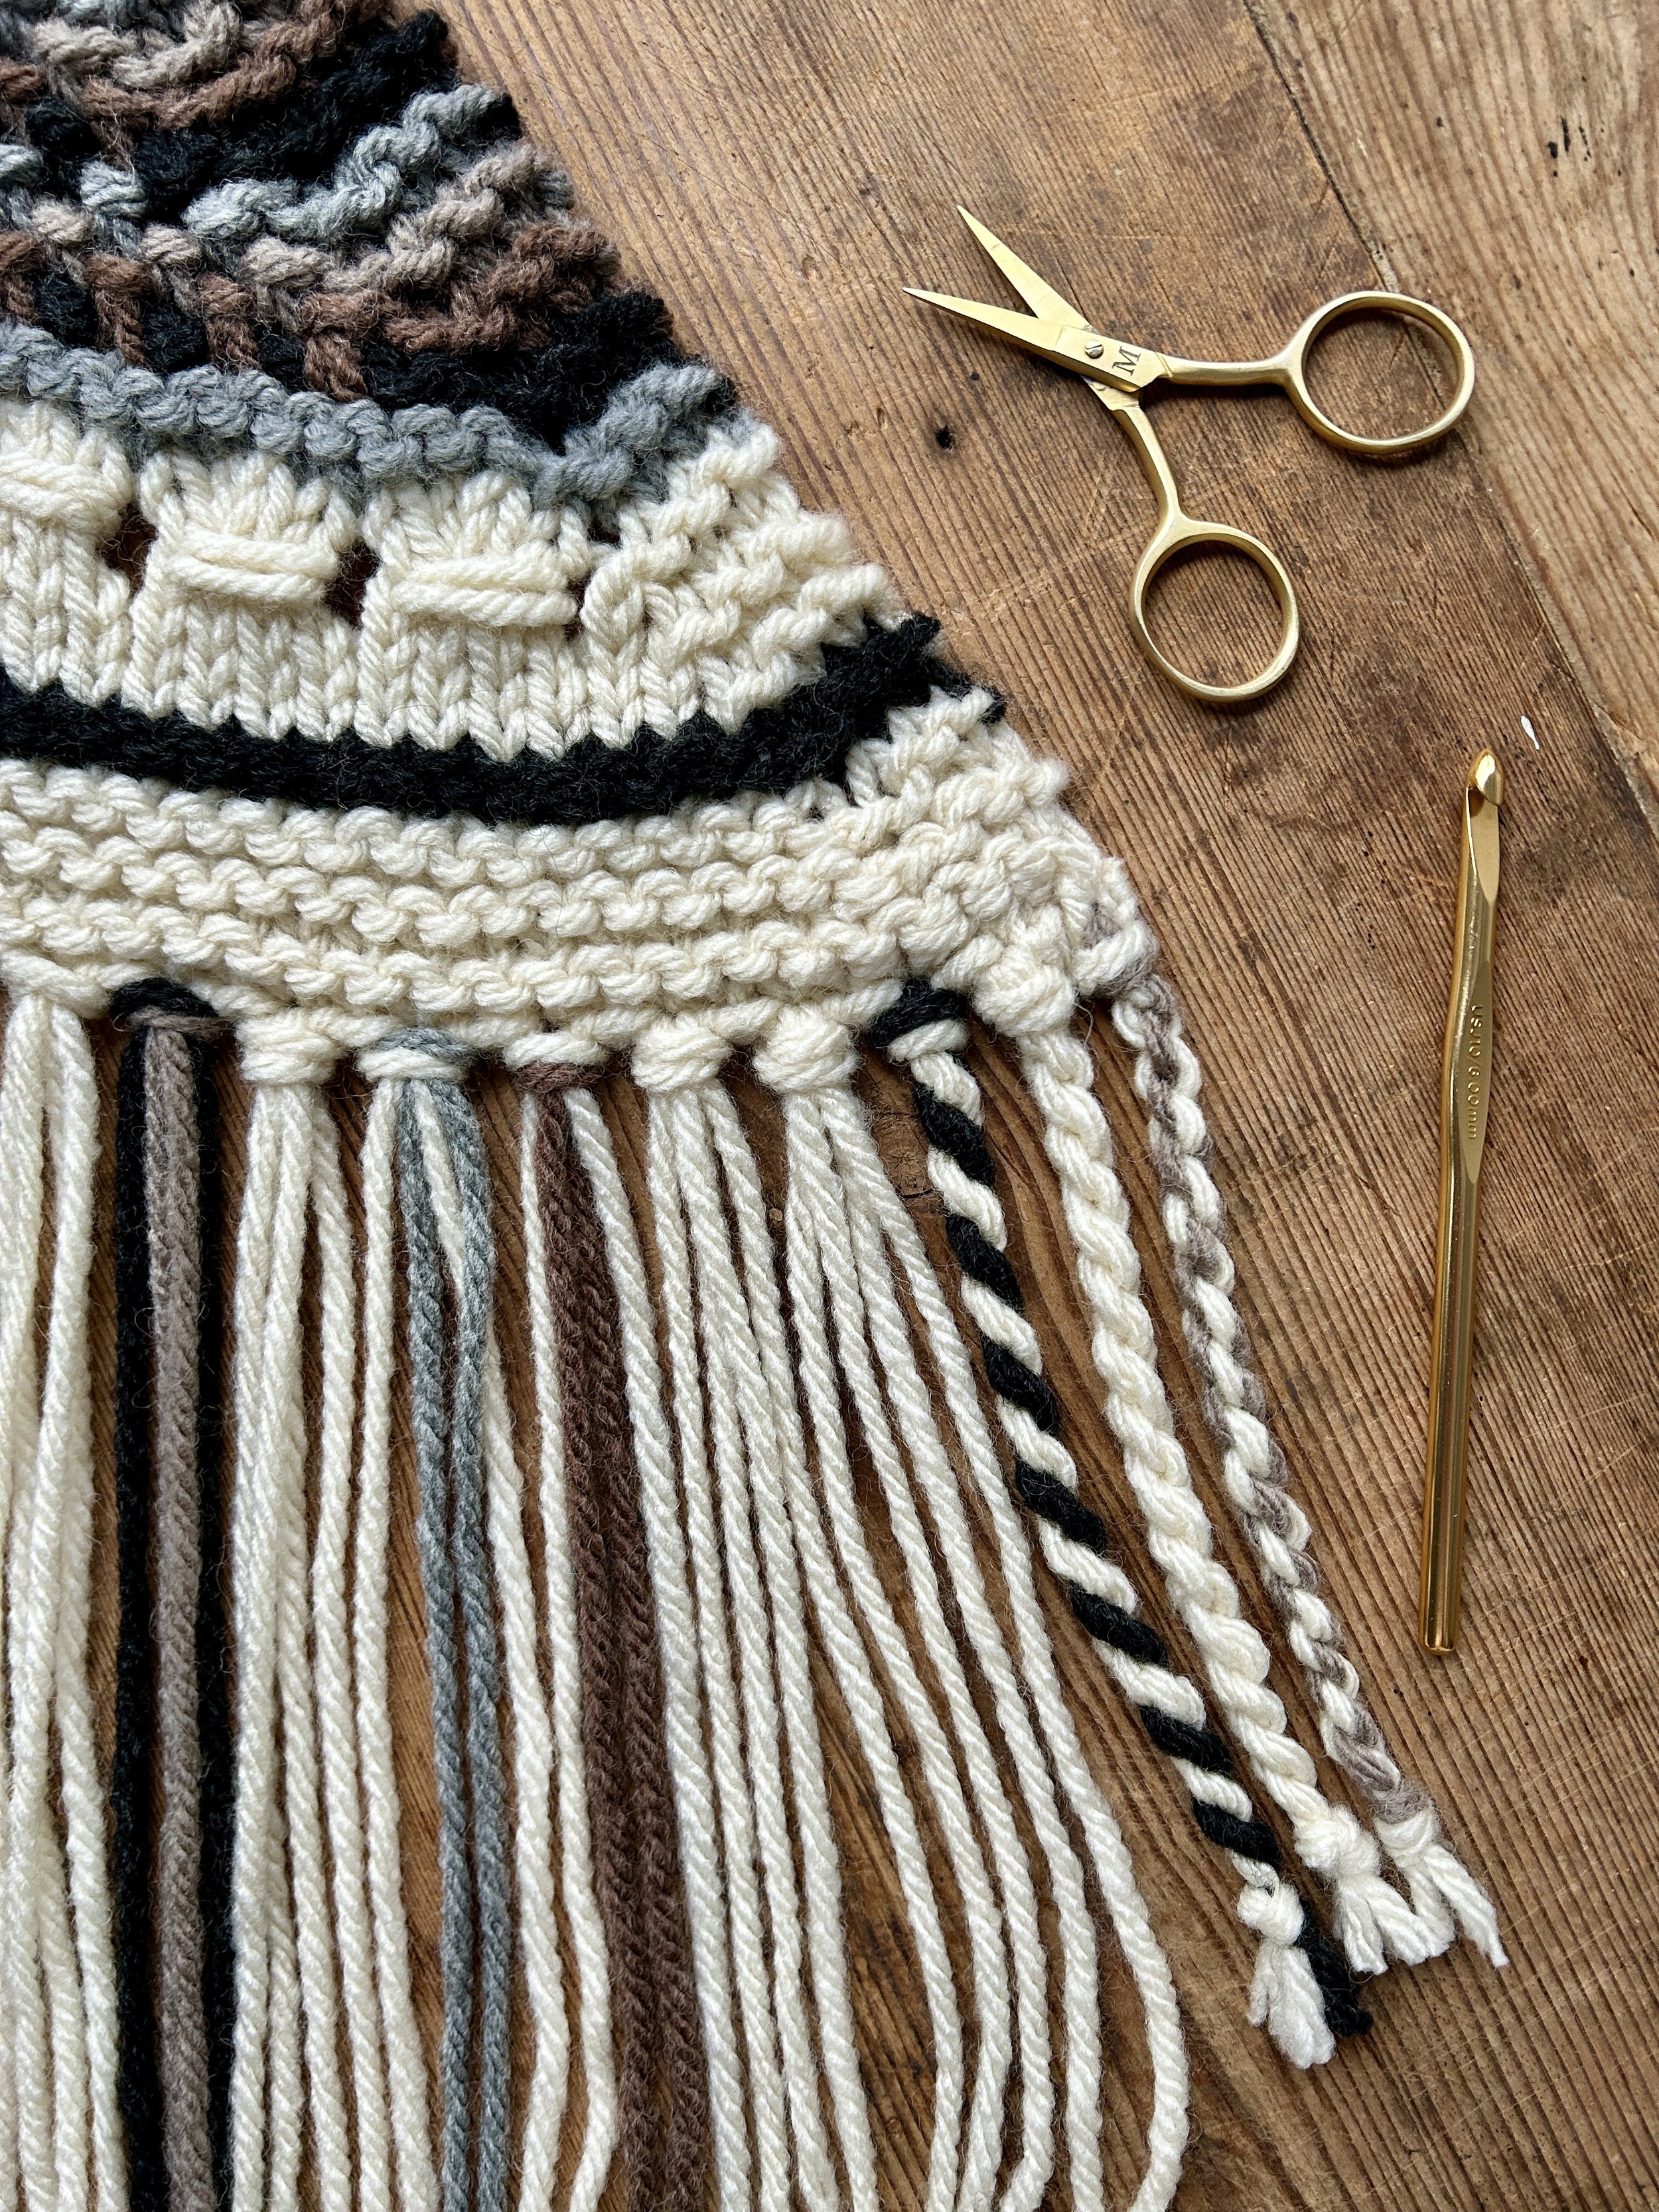
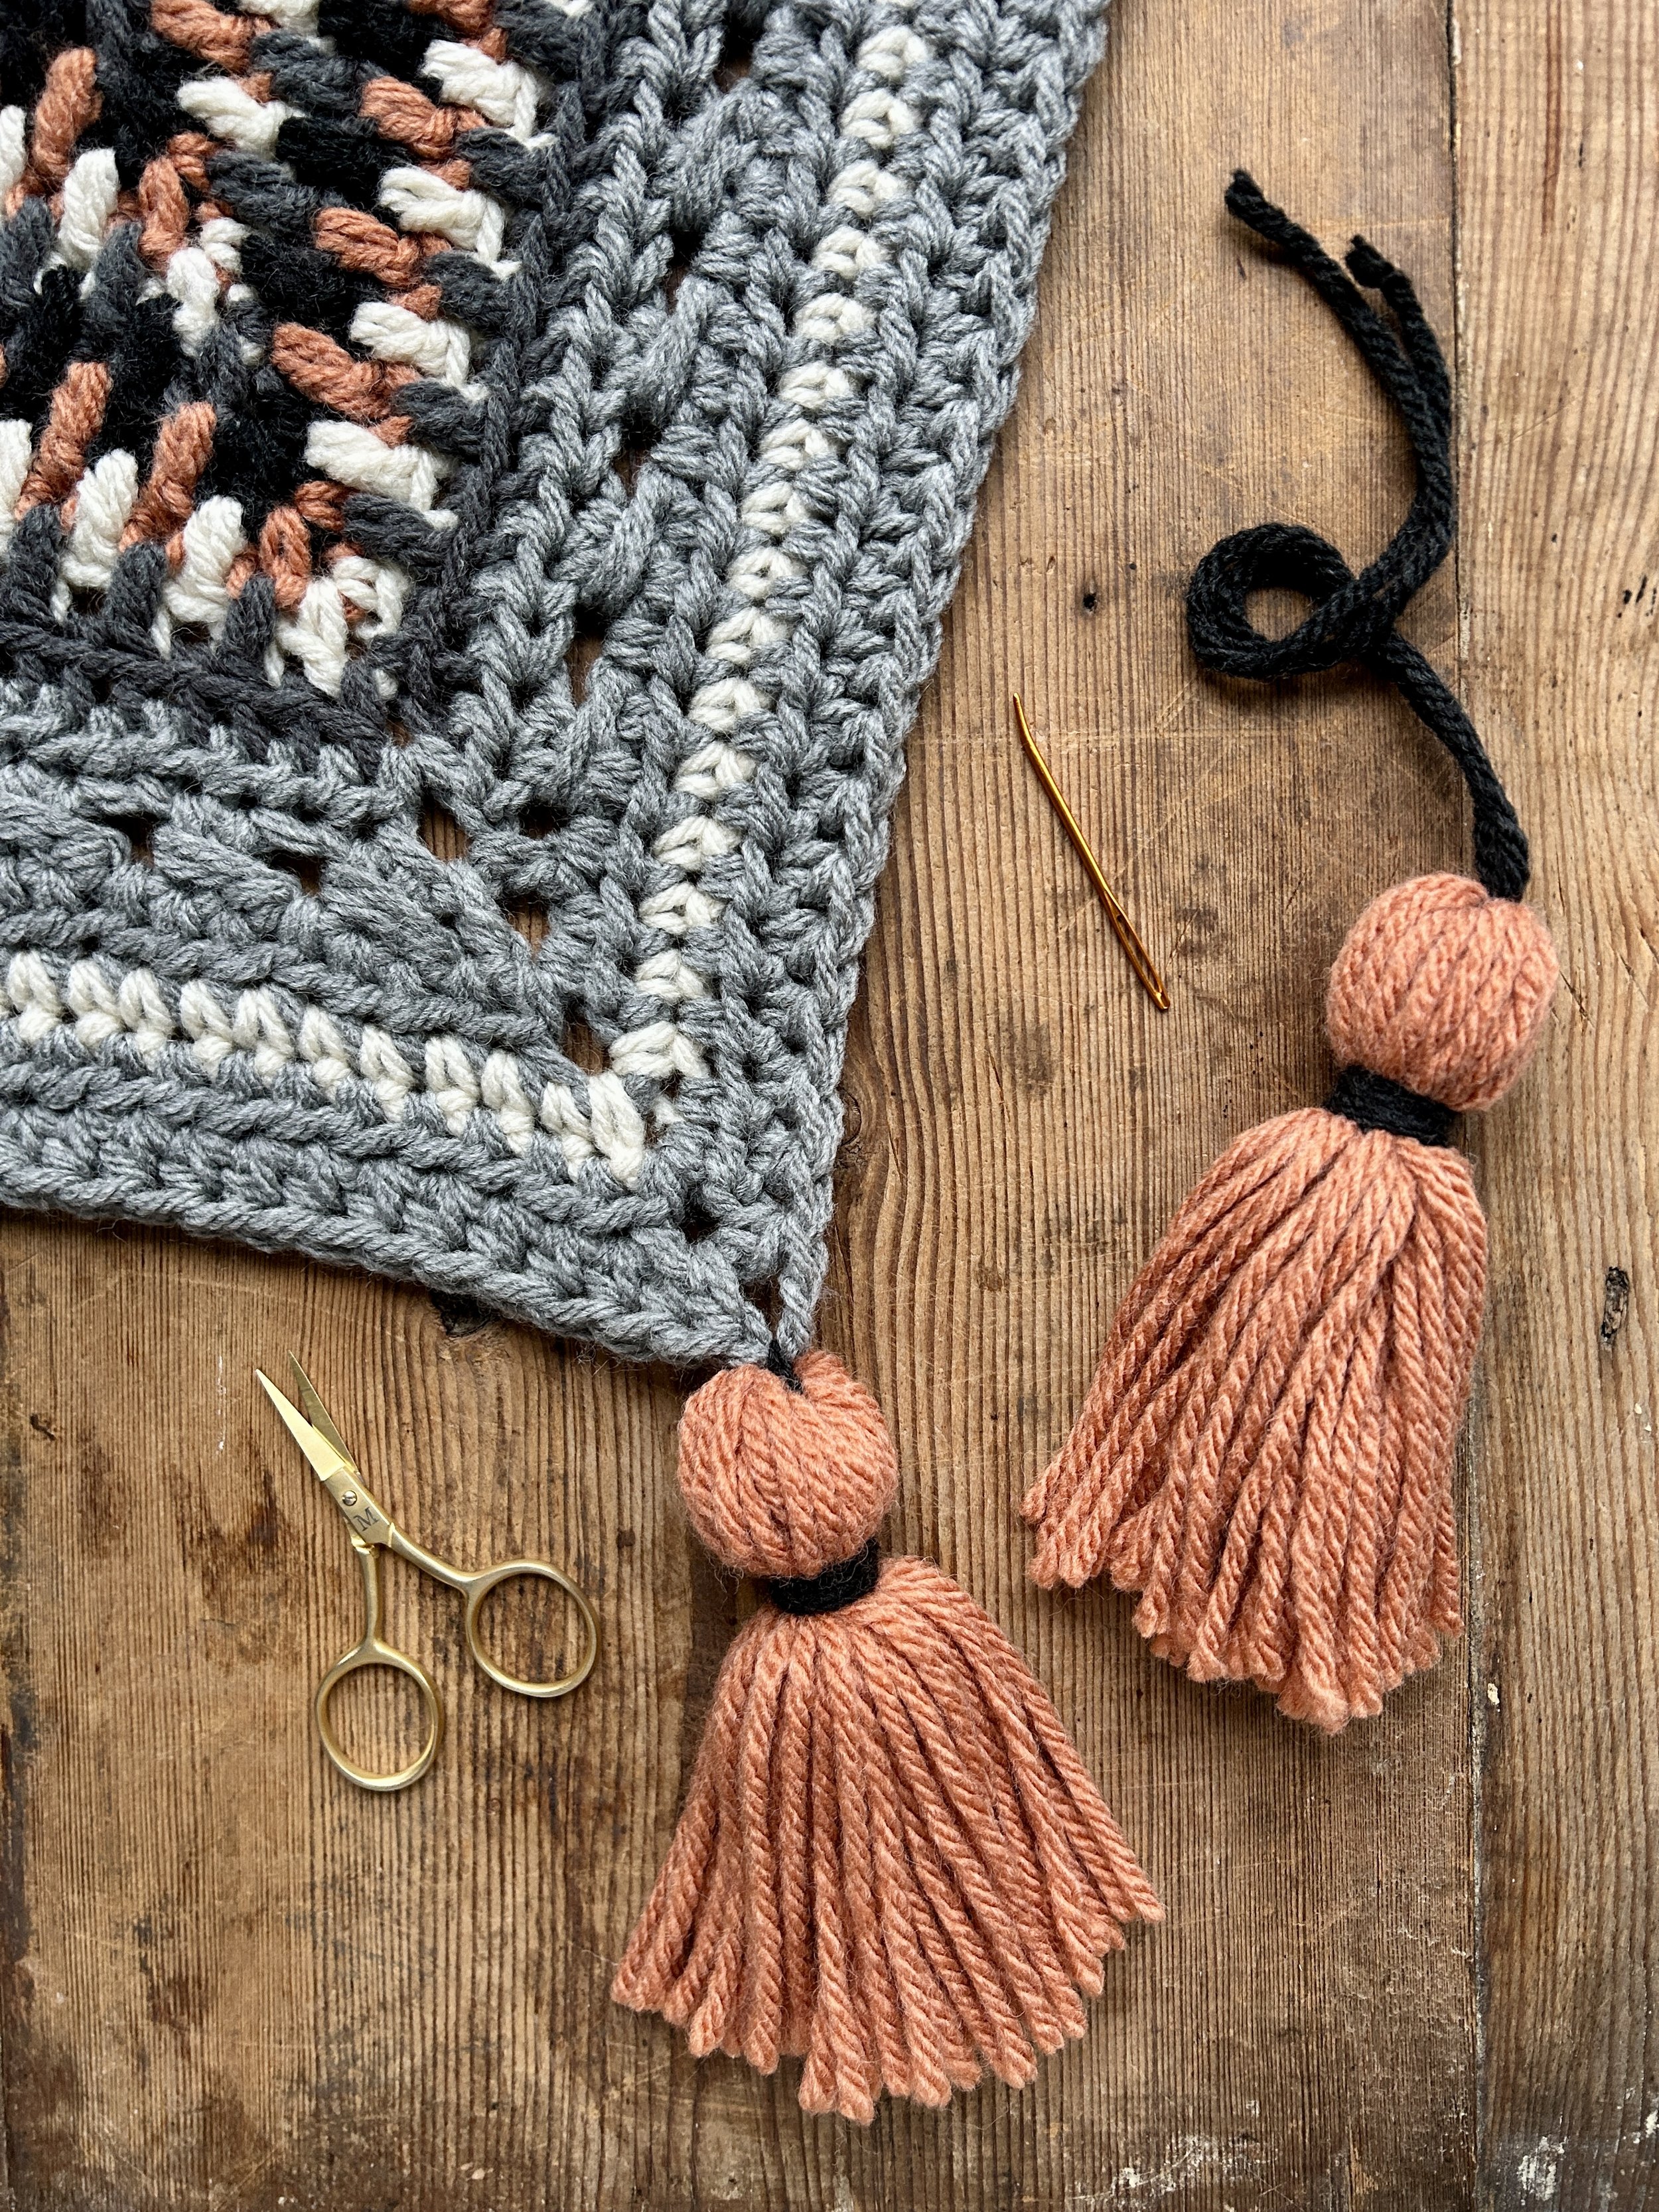
TASSELS
Cut 90 12”/30.5cm lengths of CC4 + six 18”/46cm lengths of CC3. Divide the 12”/30.5cm lengths into three groups of 30. Tie each bundle at the middle point with one of the CC3 18”/46cm lengths. Fold each bundle in half so that the tie is at the tip of the loop created with the fold.
Tie crosswise around each folded bundle about 1.5”/4cm below the top of the fold with the remaining CC3 18”/46cm lengths. Wrap the tails of the ties around and around the bundles and then thread them inside and down the middle of the bundles with a tapestry needle. Tie the tops of the tassels onto the three corners of the wrap and knot to secure. Thread the tails inside and down the middle of the tassels using a tapestry needle. Trim tassels to desired length.
TRADITIONAL FRINGE
Cut 384 18”/46cm lengths in your choice of colors. Holding two strands together at a time, attach fringe to each stitch along the bottom edge of the wrap using a larks head knot. To do so, fold the two strands in half and use the crochet hook to pull the folded loop through a space along the edge, then draw the ends of the strands through the loop to create the larks head knot. Trim fringe to desired length.
TWISTED FRINGE
Work as for traditional fringe. Treat each double strand as if it were one. Separate the four strands of one fringe bundle into two pairs of two. Twist each pair separately in the same direction that the yarn twists until it buckles easily when you give it a little slack. Then twist the two pairs together in the opposite direction, forming a rope. Knot at the end to secure. Rep across all fringe. Trim ends for a clean edge.
Purchase the printable, ad-free pattern here.
Purchase the kit from Lion Brand here.
Don't forget to share your projects made using Two of Wands patterns on Instagram with the hashtag #crewofwands to get featured on my page and be in the running for monthly pattern giveaways!
Join the Crew of Wands Facebook group to connect with other makers of Two of Wands patterns for help with techniques and pattern related questions.
The patterns and photographs of items on this site are the property of Two of Wands and are for personal, non-commercial use only. These patterns files are protected by US copyright, and you may not distribute or sell them electronically or physically. Small batch sales of finished pieces made from these patterns are permitted, but seller must use their own photographs and credit must be given to Two of Wands as the designer.